Android 15 has begun rolling out to major devices including Pixel smartphones. The update brings significant improvements with additional features like Lock Screen, Notification Cooldown, Quick Settings tool, App Archive, Battery Health Percentage, and much more. As usual, when Android software’s release, it comes with major issues or unknown bugs. Many users are already received the update and started encountering problems.
A prevalent issue that many users have been encountering is the malfunction Wi-Fi network. You heard it right. When users are trying to connect their device with the Wi-Fi network, the Wi-Fi is not working or either keeps disconnecting, leaving the individual users desperate. So, if you are having this kind of issue on your Android 15, don’t fret. In this tutorial, we will explore some of the effective workarounds that will help you in fixing the Wi-Fi not working issue.
Why Is My Wi-Fi Not Working or Keeps Disconnecting on Android 15?
There can be various reasons for the Wi-Fi not working on Android 15. A couple of users are unable to connect to the network, and some are unable to find the network on their smartphones. Below, we have shared the common reason behind the issue.
- Software Issues: As many users face the issue after updating the software, it can be confirmed that the issue occurs due to software conflicts. The update could have bugs that affect the WiFi connectivity.
- Interference & Signal Strength: If you have a weak Wi-Fi signal strength, then it may prevent you from connecting to Wi-Fi networks. Apart from that, the interference of electronic devices would be the same.
- DNS Problem: Internet Service Provider’s (ISP) default DNS servers may negatively affect the Wi-Fi network, which can reduce overall speed and reliability.
- Expired Internet Service Bill: If the Wi-Fi is connected to the device but does not provide internet access, it means the internet service bill has expired, and you have to buy the pack again.
- Bluetooth and VPN Interference: In some cases, Bluetooth and VPN interference can cause problems with the Wi-Fi due to the radio spectrum usage.
These were some of the common reasons for the Wi-Fi not working on Android 15. In addition, there might be other reasons for the issue, such as an improper connection with the router, an incorrect Wi-Fi password, an enabled battery saver mode, and more.
Ways to Fix Android 15 Wi-Fi Not Working Issue
We have shared the effective solutions that will help you in resolving the Wi-Fi network not working or keeps disconnected on your Android 15 smartphone. Do remember that the methods listed below are applicable to all the devices that are running on Android 15. In some scenarios, the settings might be slightly different, but most are identical.
Make sure to follow all the workarounds till the end until or unless you fixed the issue with the Wi-Fi network on your Android 15 smartphone.
Fix 1: Check Your Internet Connection
The first and foremost thing you have to do is check your internet connection on Wi-Fi and ensure the internet service provider is delivering a stable network to you. You can identify the network connection speed by utilizing tools like network analyzer, ping, and traceroute to access the parameters.
Additionally, you can verify the internet bill for your Wi-Fi network which will be limited for every individual user. You have to recharge the payment after ending the time period of Wi-Fi services. An overdue bill would be result in suspension on services which may usually affect the Wi-Fi connectivity.
It is suggested you clear all your pending internet bills due you have activated and then check back the problem. Moreover, you can contact your ISP for assistance regarding this matter.
Fix 2: Verify Your Router Location
Another thing you have to do is verify your router location. Most of the time, the router location impacts the Wi-Fi signal strength, so it’s best to place your router in an open area to get the better strength and network. In addition, change the router location from the electronic devices which can interfere with the Wi-Fi network, reducing the signal strength and stability.
Fix 3: Restart Your Router/Modem
You can restart your router or modem that will clear the memory and fix the potential issues and glitches. This will re-establish the network connection and refreshes the router’s settings. To restart your router or modem, follow the below steps:
- Unplug the power cable from the wall socket to turn the router off.
- Then, wait for a few minutes.
- Re-attach the power cable on the wall socket and turn on the router.
- Now connect the Wi-Fi network and check if the issue has been fixed.
Fix 4: Restart your Device
It is suggested you restart your smartphone as well, apart from restarting your router or modem. This will generally solve the bugs or technical glitches which might affect the Wi-Fi connectivity. It is one of the easiest ways to solve temporary issues and bugs which mostly work.
Here’s how you can restart your Android 15 smartphone by following these steps:
- Press and hold the Power + Volume Up button and you will get the menu on the screen.
- Release the power button and tap on Restart.
- As soon as you tap on it, the phone will automatically restart by itself.
Fix 5: Toggle Wi-Fi & Airplane Mode
You can also toggle Wi-Fi & Airplane mode on your smartphone. All you have to do is tap on Wi-Fi from the control panel to turn it off. Then, wait for a moment and turn the Wi-Fi back on. This may usually allow you to reconnect the network if there’s an issue with the Wi-Fi and its settings.
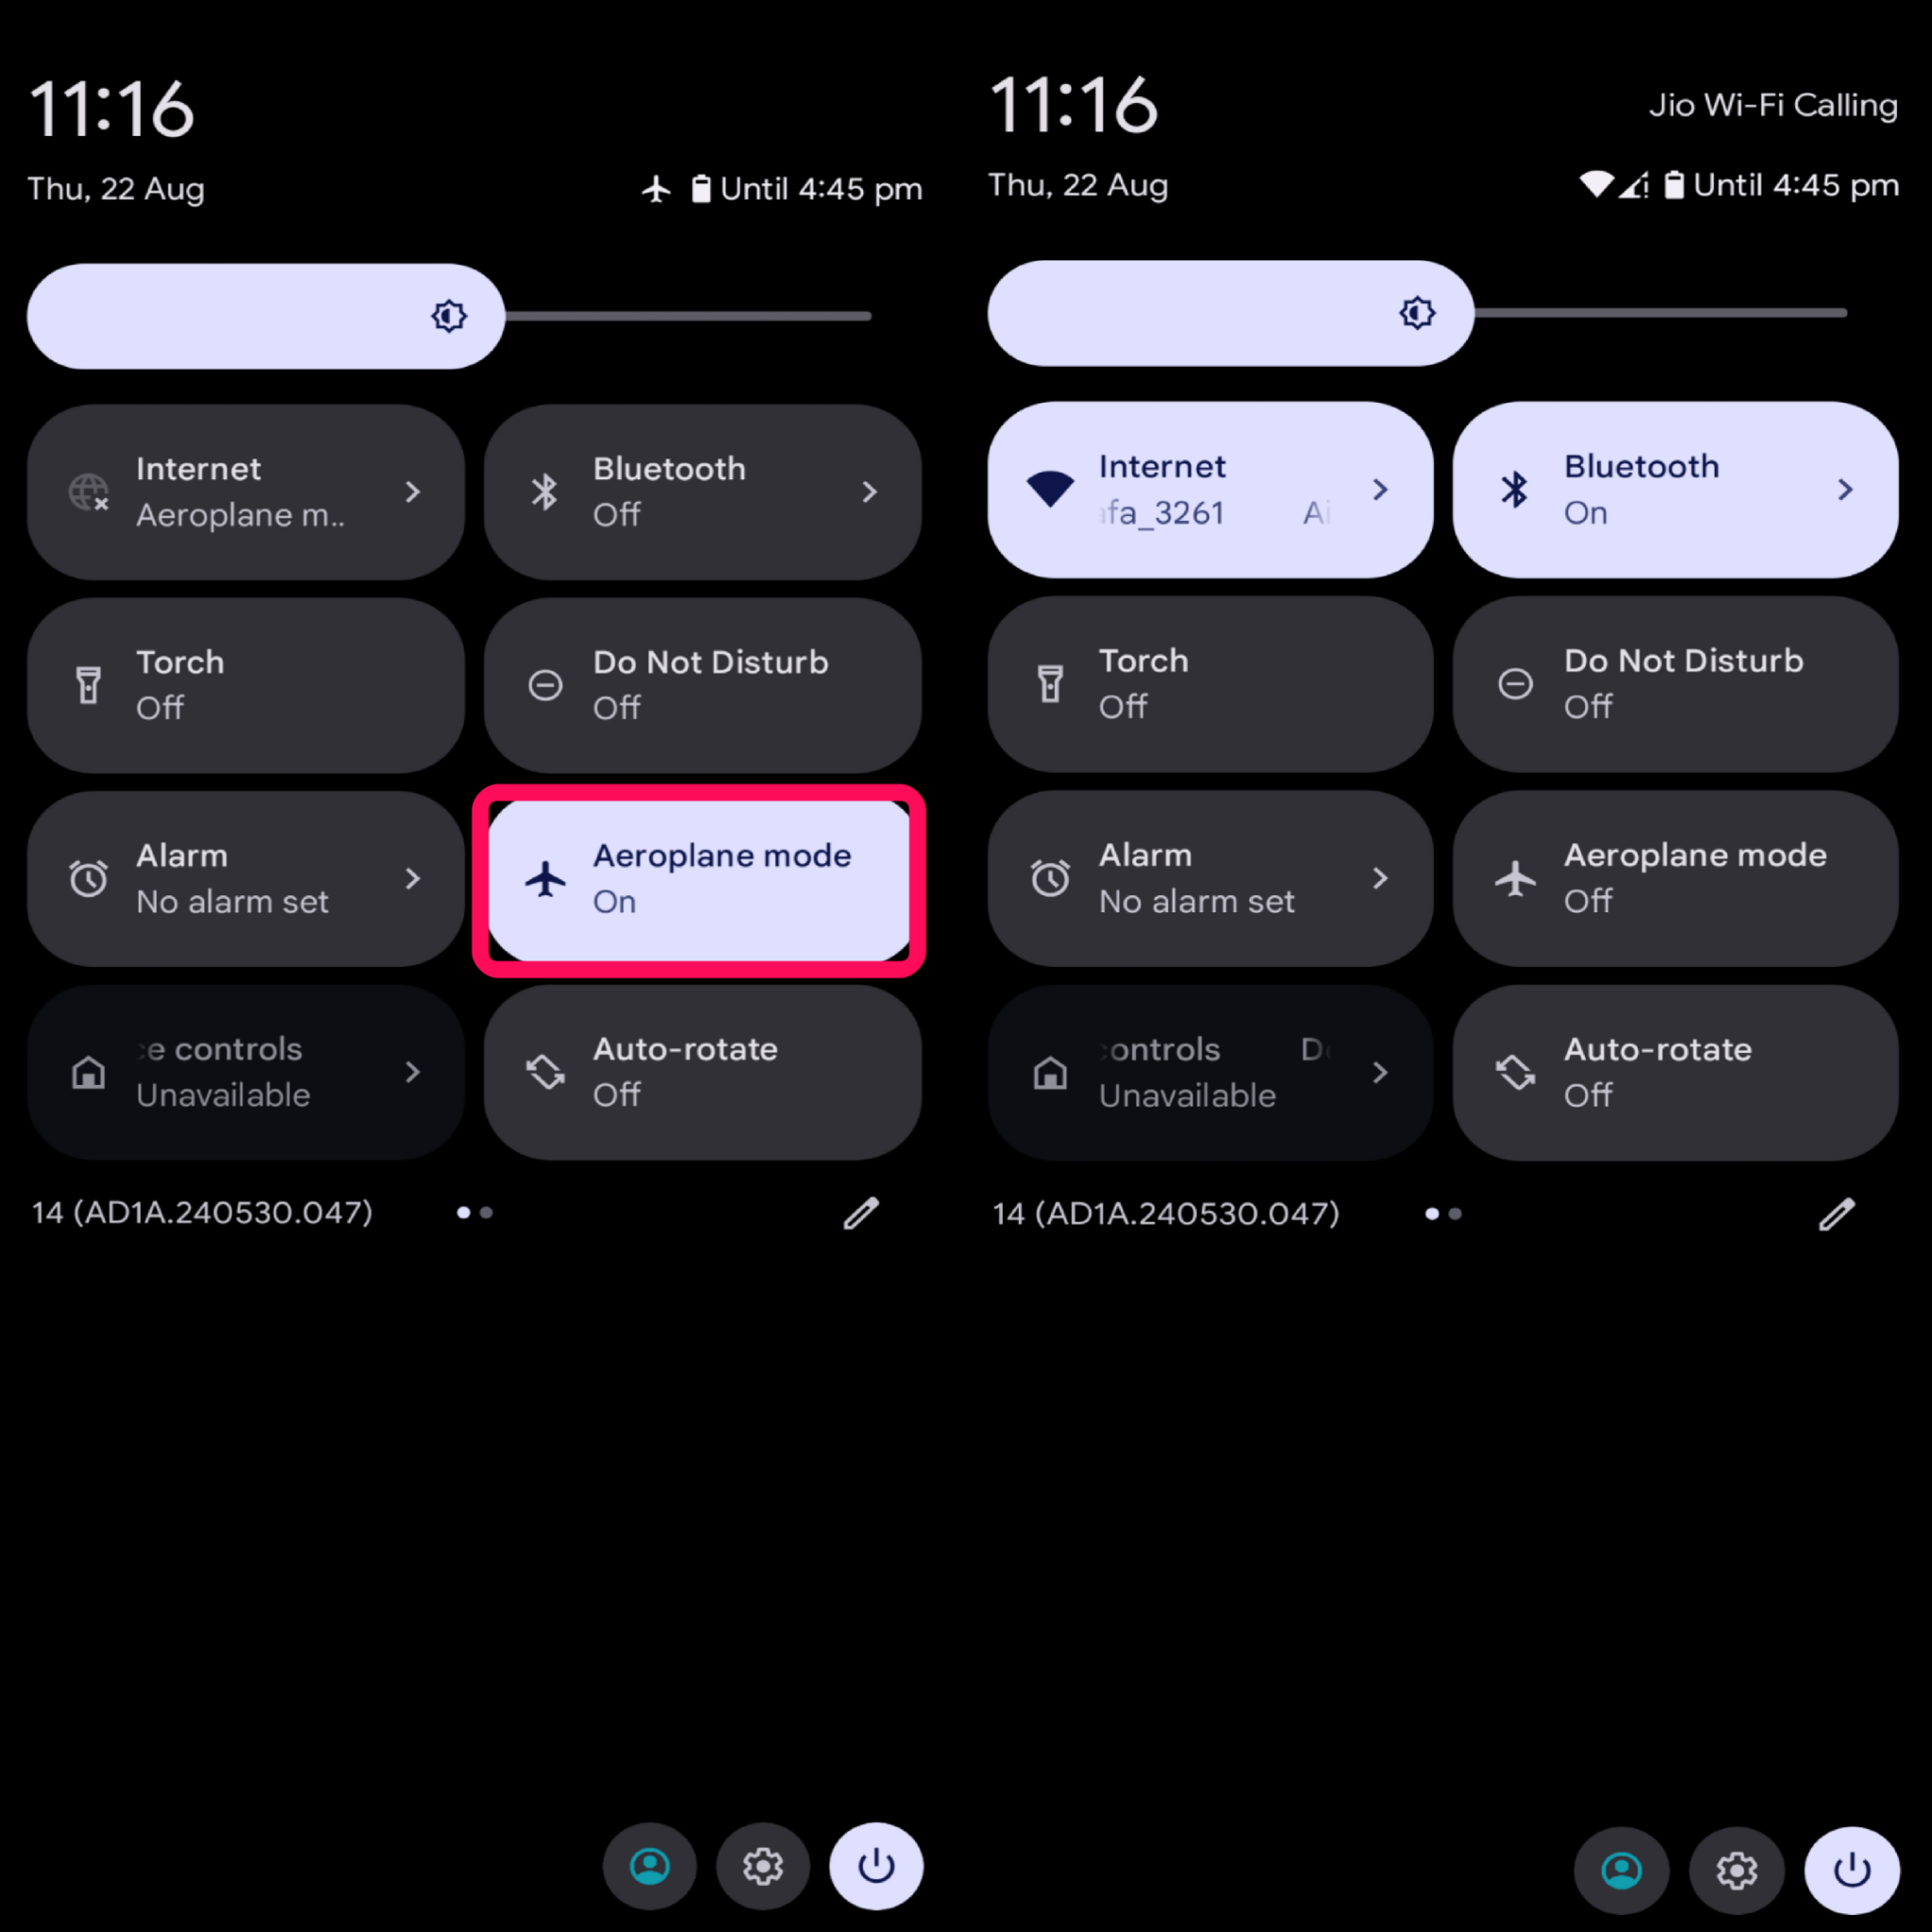
Additionally, you can toggle Airplane mode. Generally, the Airplane mode prevents the making or receiving wireless connections when it is activated. Make sure to toggle off the Airplane mode and then toggle on back to check if the issue has been fixed.
- Swipe down from the top to access the Control Centre or Quick settings menu.
- Tap on the Airplane Mode icon (an Airplane silhouette). It will change to a dark color when you enable it.
- Wait for a few seconds and tap on the Airplane mode icon back to turn it off.
Fix 6: Try Fix Connectivity Feature
Google has added a new feature to fix the connectivity functionality that is mainly designed to rectify the connectivity issues related to Wi-Fi network. This feature was added with Android 13 software. So, you can give it a try to check whether the issue has been fixed or not. Here’s how:
- Open the Settings app on your phone.
- Tap on Network and Internet > Internet.
- Then, tap on the Fix Connectivity icon at the top right corner.
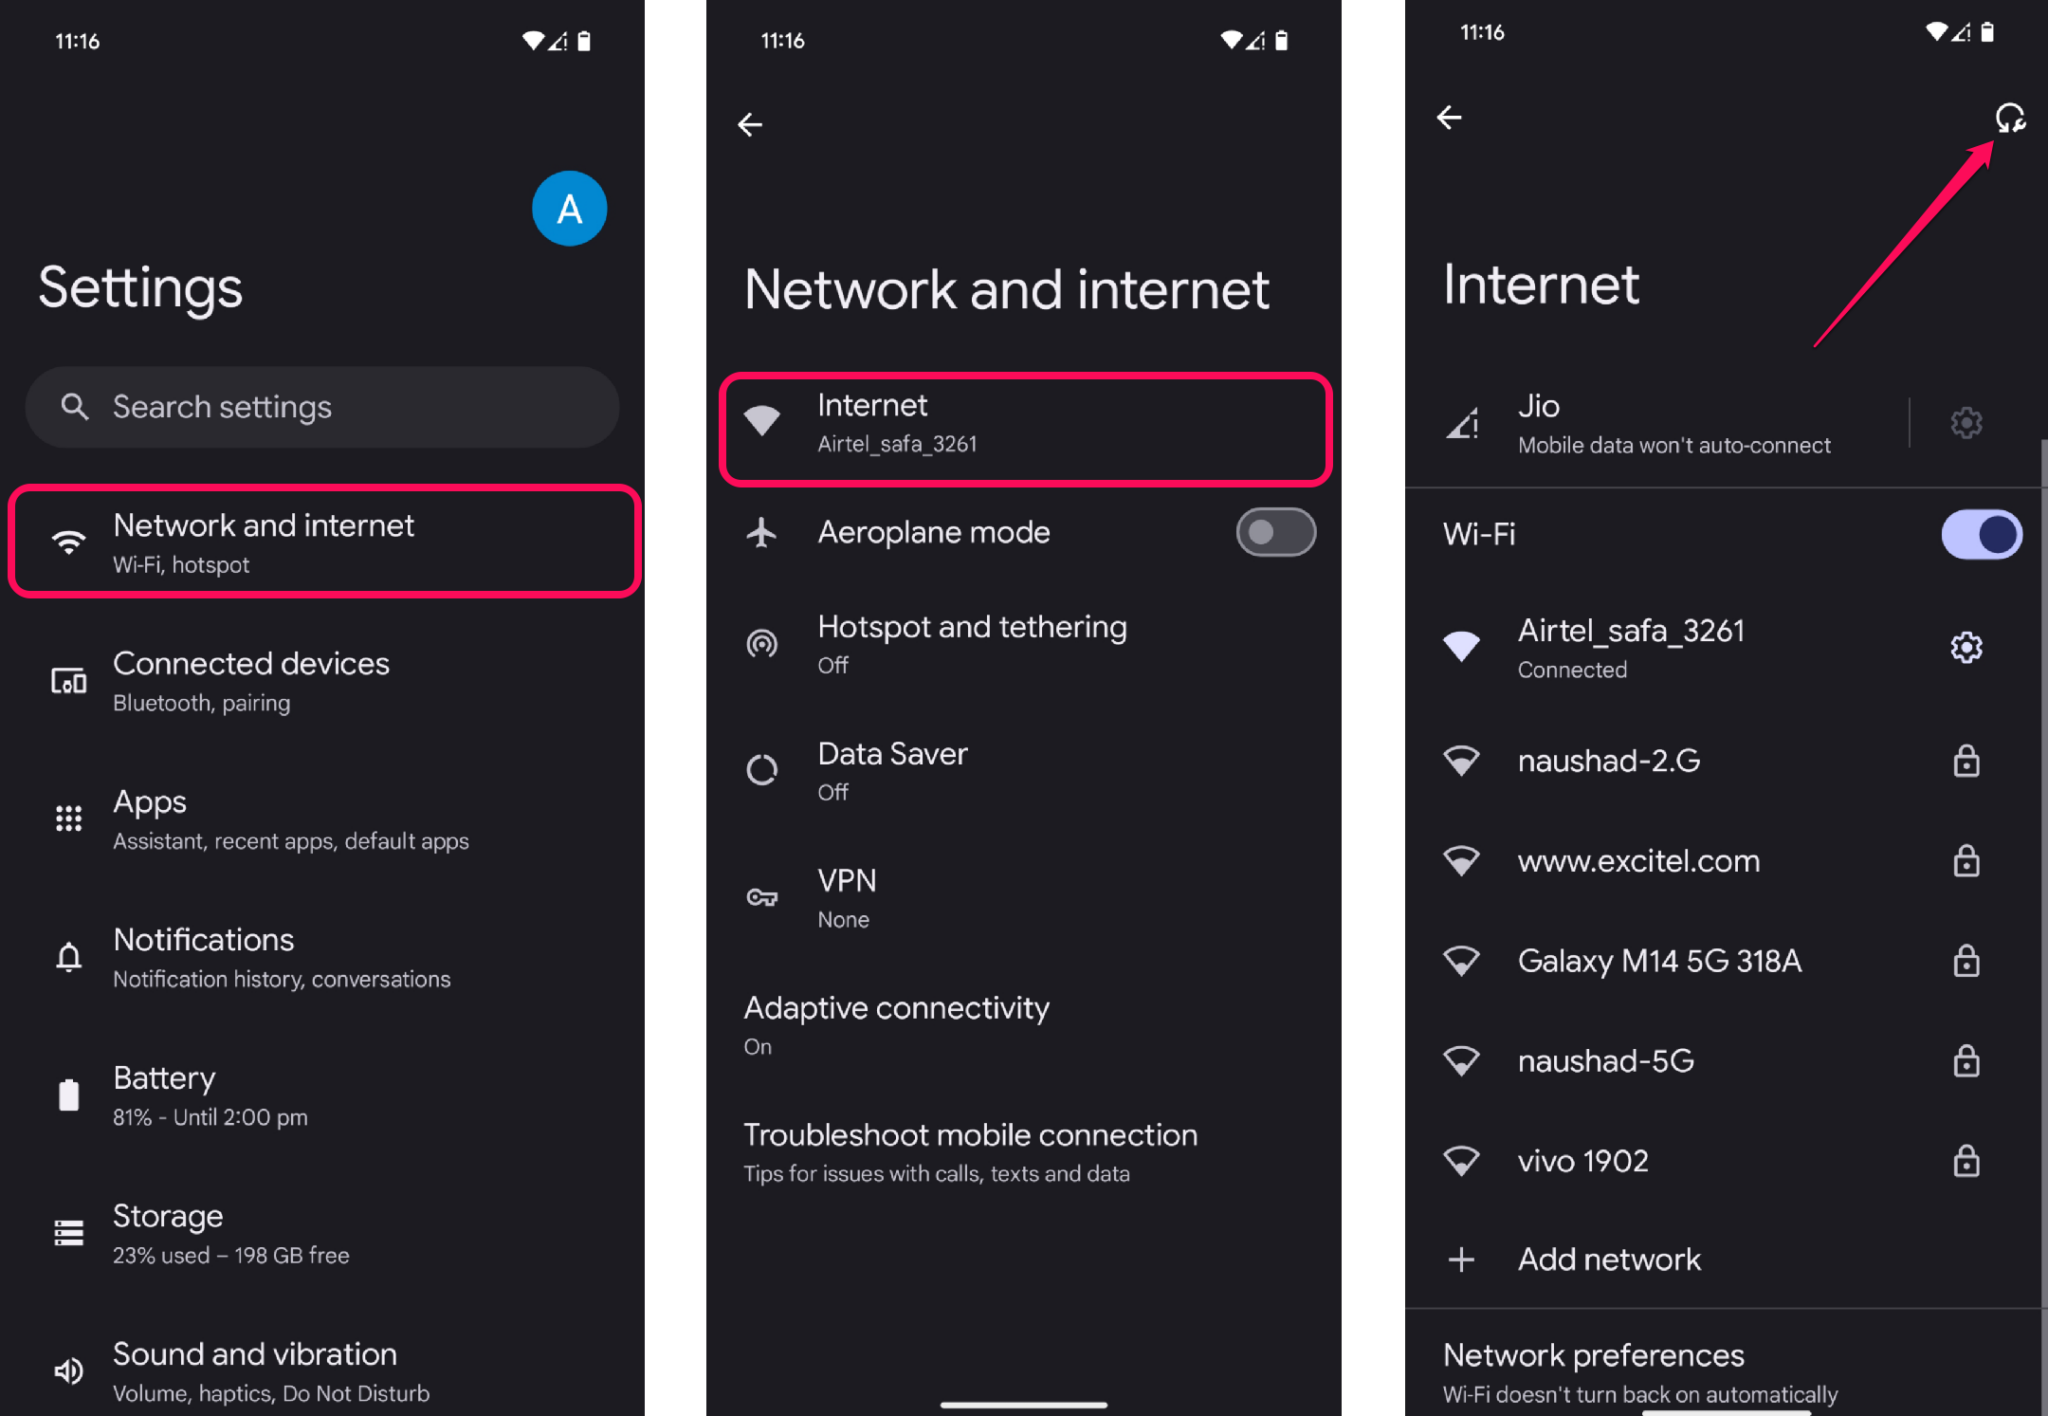
- Wait for a few seconds and then connect your device with Wi-Fi.
- Check if the Wi-Fi issue has been rectified on your device.
Fix 7: Check MAC Address Filtering on your Router
The Media Access Control (MAC) Address Filtering involves configuring router settings that can allow or deny each device based on their Mac addresses. Make sure you’re not in the rejected list, and if you are there then you can’t connect to the Wi-Fi network anymore. If it’s your router, you can sign in to verify the MAC address filtering. Here’s how:
- Open the web browser and ensure you’re connected to the same Wi-Fi network.
- Enter the IP address of your router in the address bar. (You can find the IP address at the back of the router).
- Now, enter your username and password provided by your ISP. (Or you can find it written on the back of your router, and log in.
- Once you logged in, then check for a setting similar to Blocked Devices or MAC Filtering.
- Make sure your device’s MAC address is not listed there. If it is, then ensure to remove it and save the changes.
- Finally, restart the Wi-Fi router and connect your device to the Wi-Fi to check if the issue is resolved.
To find your phone’s MAC address, follow these steps:
- Open Settings on your phone.
- Tap on Network and internet > Internet.
- Then, tap on the Wi-Fi network you are connected to or simply tap the gear icon next to it.
- Scroll down and your MAC address will be listed under “MAC address.”
Fix 8: Reset Your Router/Modem
If everything is perfect with a MAC address, then you can reset your router or modem. It could be possible that incorrect settings are preventing the Wi-Fi network from working correctly. We suggest you reset the Wi-Fi router to revert the changes to their default settings. Follow the below steps to do so.
Note: Resetting a router/modem to their default state will completely wipe out the data that has been saved such as the Wi-Fi network and its password.
- Locate a little hole or buttons on the back or underside of the router that act as Reset button.
- Take a pen or a paperclip and make sure the router is plugged in.
- Hold the reset button down for 10 to 15 seconds. (Do note that different routers take more time to reset).
- Place your finger on the reset button while reconnecting the router from the power source.
- Hold the reset button until the router lights start flashing.
- Once the lights stop blinking, the router has now been reset.
Lastly, you have to tweak the changes of your network settings on your router such as Network name (SSID) and password. In addition, you can go ahead with the router manual to check the process to reset the router settings.
Fix 9: Enable Turn On Wi-Fi Automatically
It would be best to enable “Turn On Wi-Fi Automatically” settings on your smartphone as it will connect the networks by scanning the nearby saved network. According to the algorithm, it will scan the strongest network whose passwords are saved in your Wi-Fi directory list. Therefore, you must consider enabling this feature. Here’s how:
- Open the Settings app on your phone.
- Tap on Network and Internet > Internet.
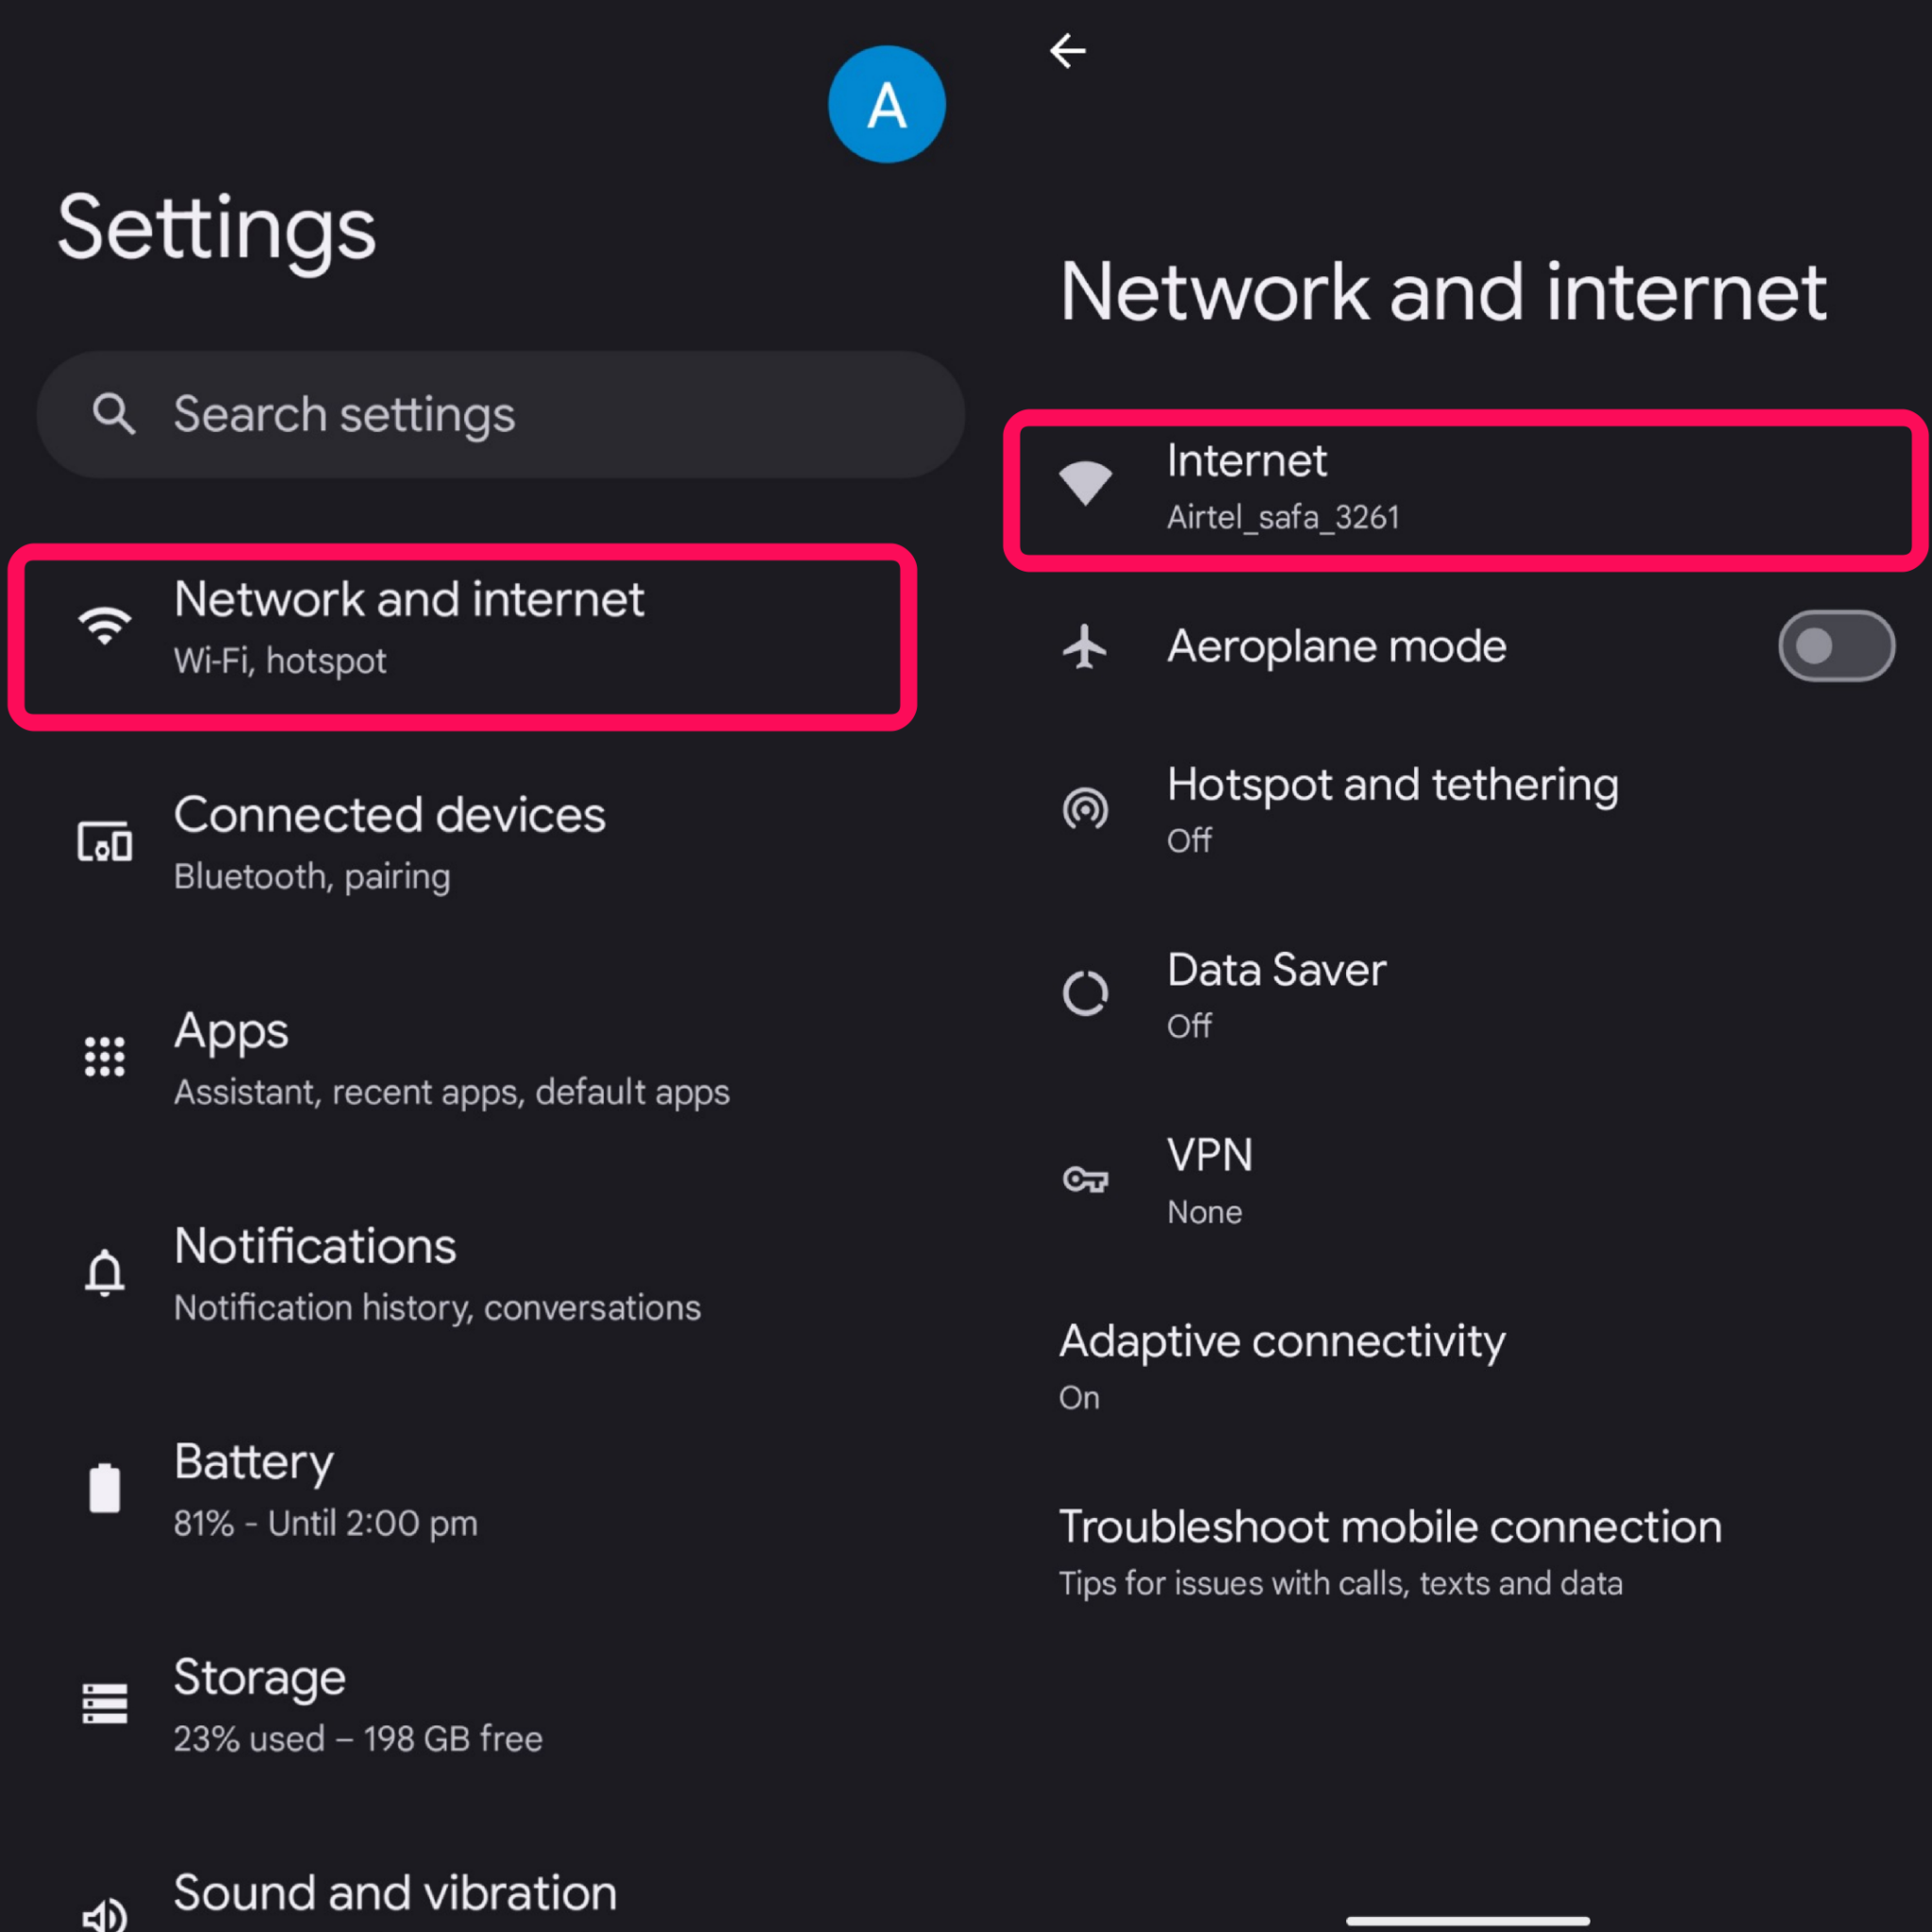
3. Then, tap on Network preferences.
4. Toggle on the “Turn on Wi-Fi automatically” option.
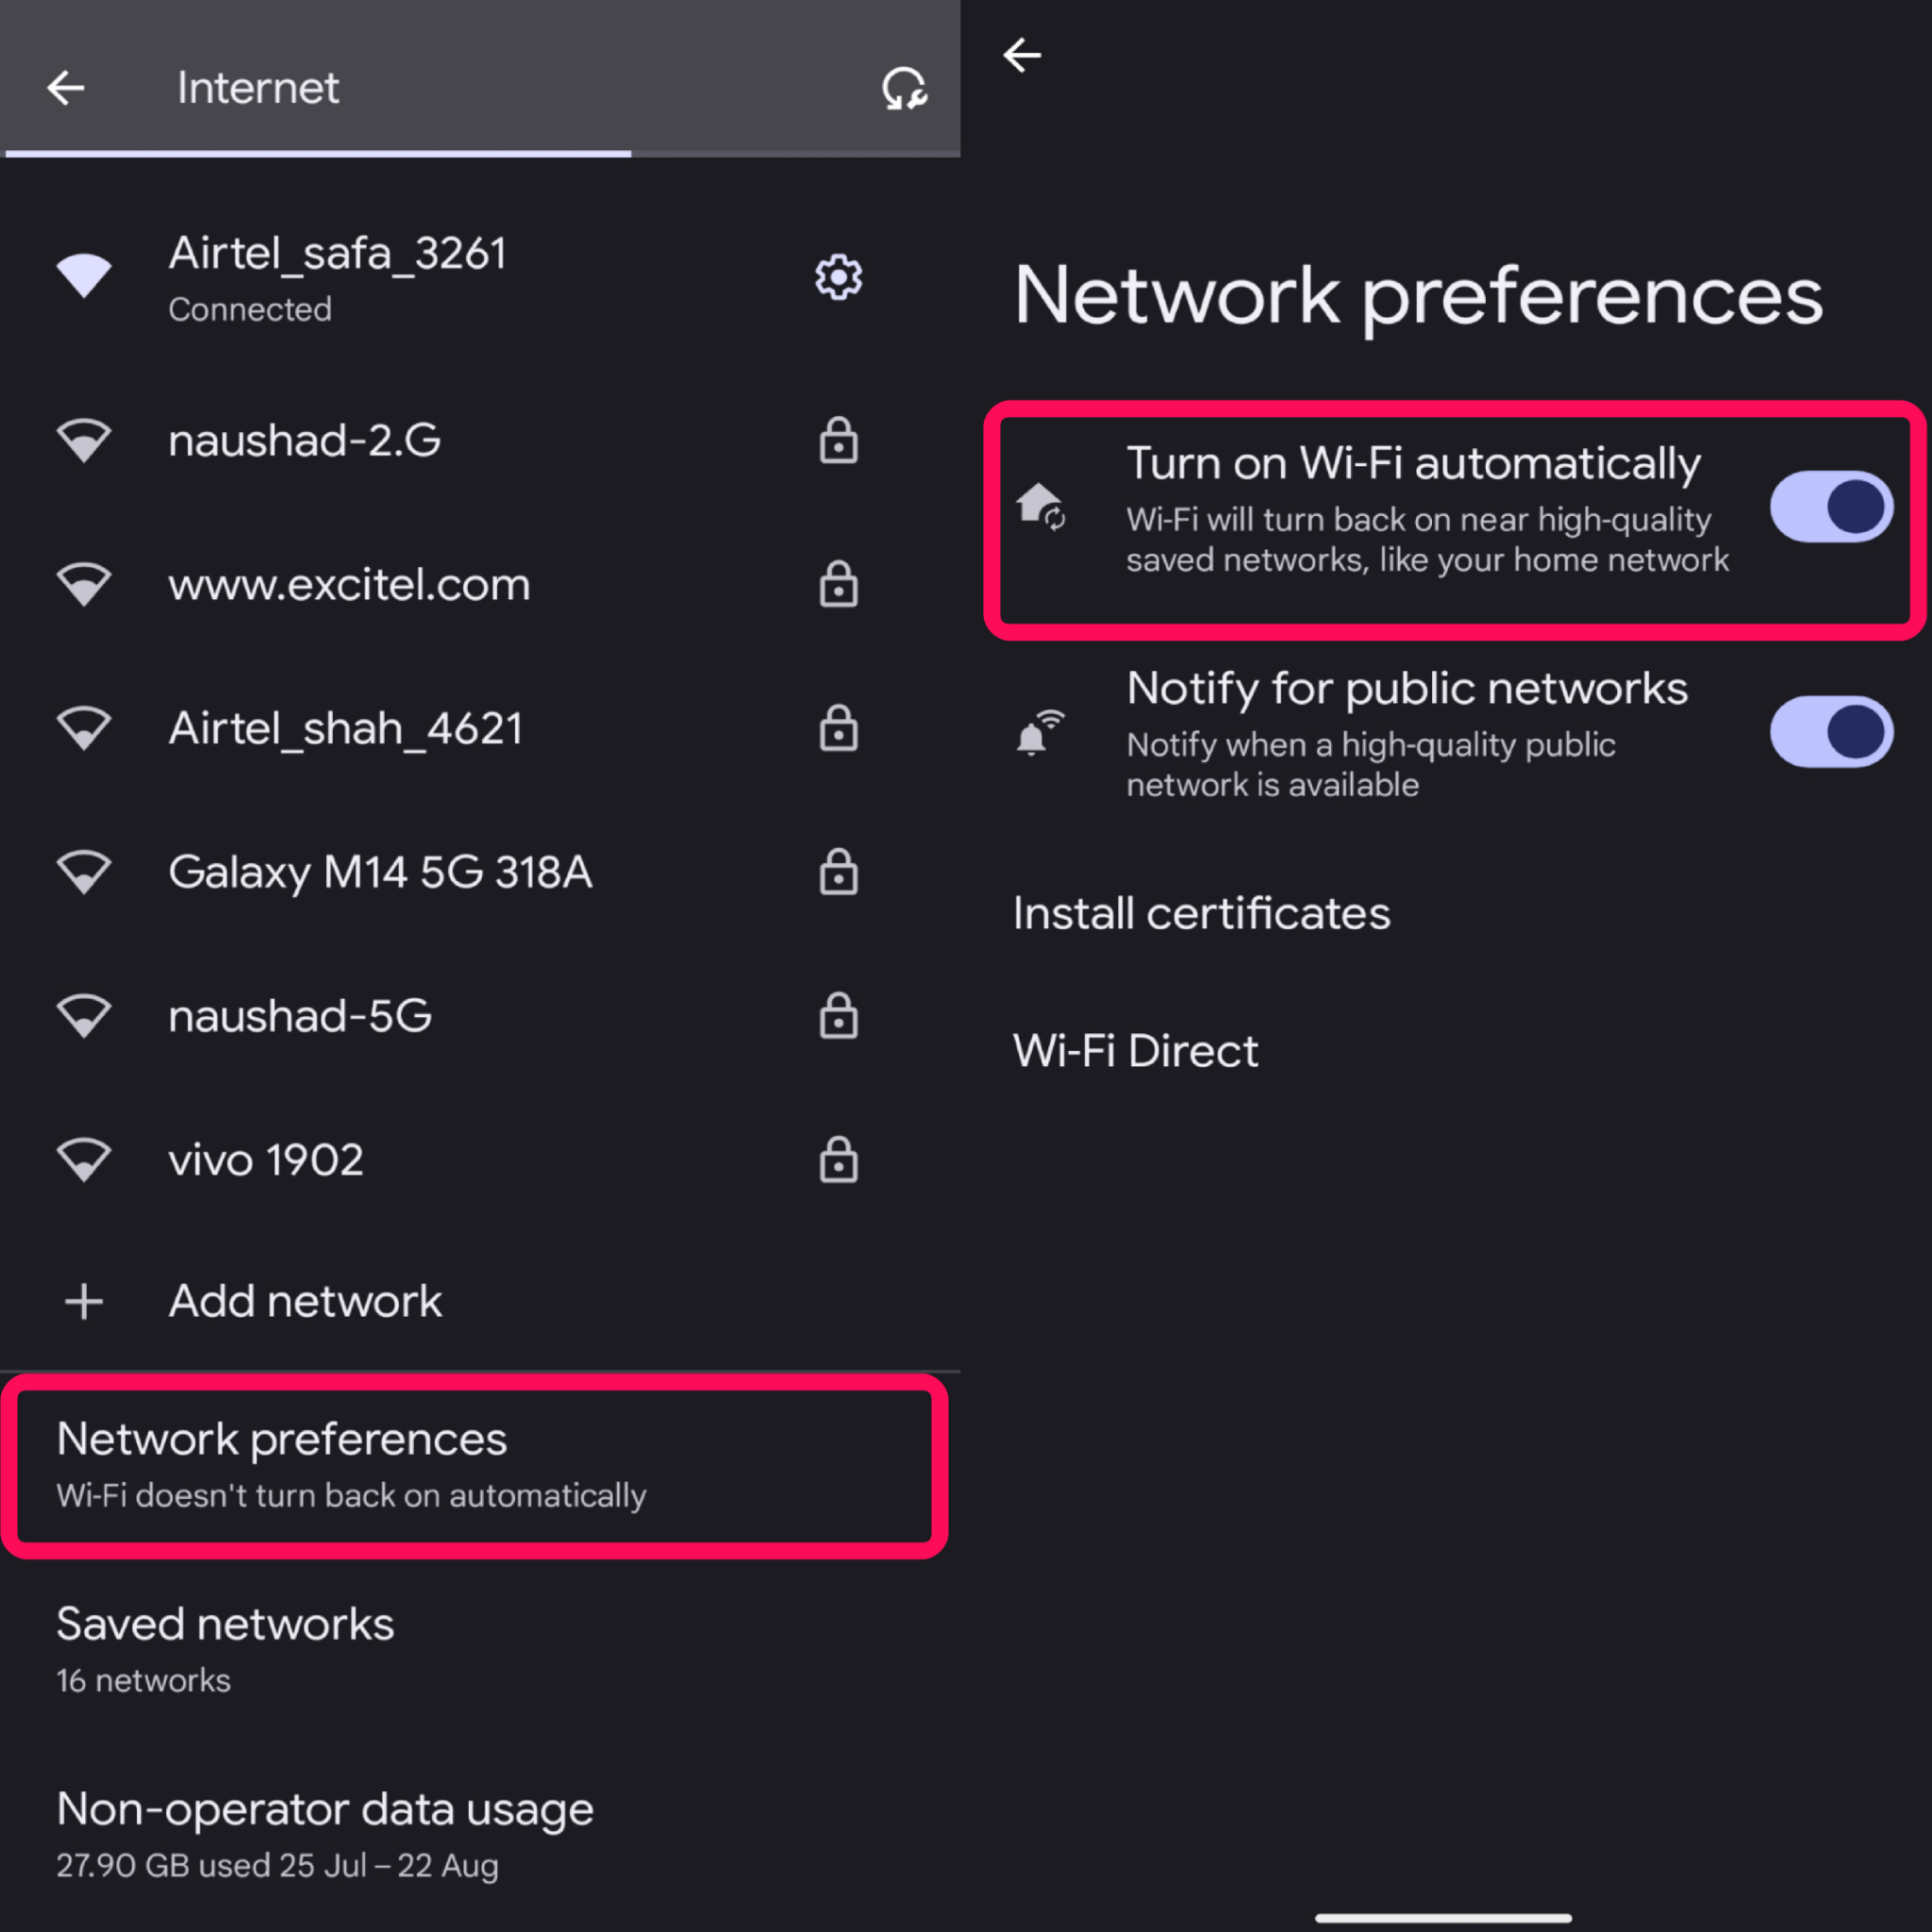
5. Connect the device to the Wi-Fi network and check if the issue has been resolved.
Fix 10: Forget and Reconnect the Network
If the Wi-Fi network is connected with your smartphone but unfortunately doesn’t give you the connection, you should forget and reconnect the Wi-Fi network. Then, you’ve to re-enter the credentials to connect to the network with a fresh connection. This will help you in establishing a new connection with the same Wi-Fi network. So, give it a try and check whether the issue has been fixed or not.
Fix 11: Disable Battery Saver
If you have enabled the battery saver mode on your smartphone then ensure to disable it now. If you have enabled battery saver on your device, it may preserve the battery by stopping the background activity that may include internet connection as well. So, if you are even connected with the Wi-Fi and using the battery saver, it might affect the Wi-Fi connection.
Make sure to disable the battery saver on your smartphone to address the Wi-Fi not working issue. Here’s how to disable the battery saver mode:
- Open the Settings app on your mobile phone.
- Tap on Battery > Battery Saver.
- Then, tap the toggle next to “Use Battery Saver” to disable it.
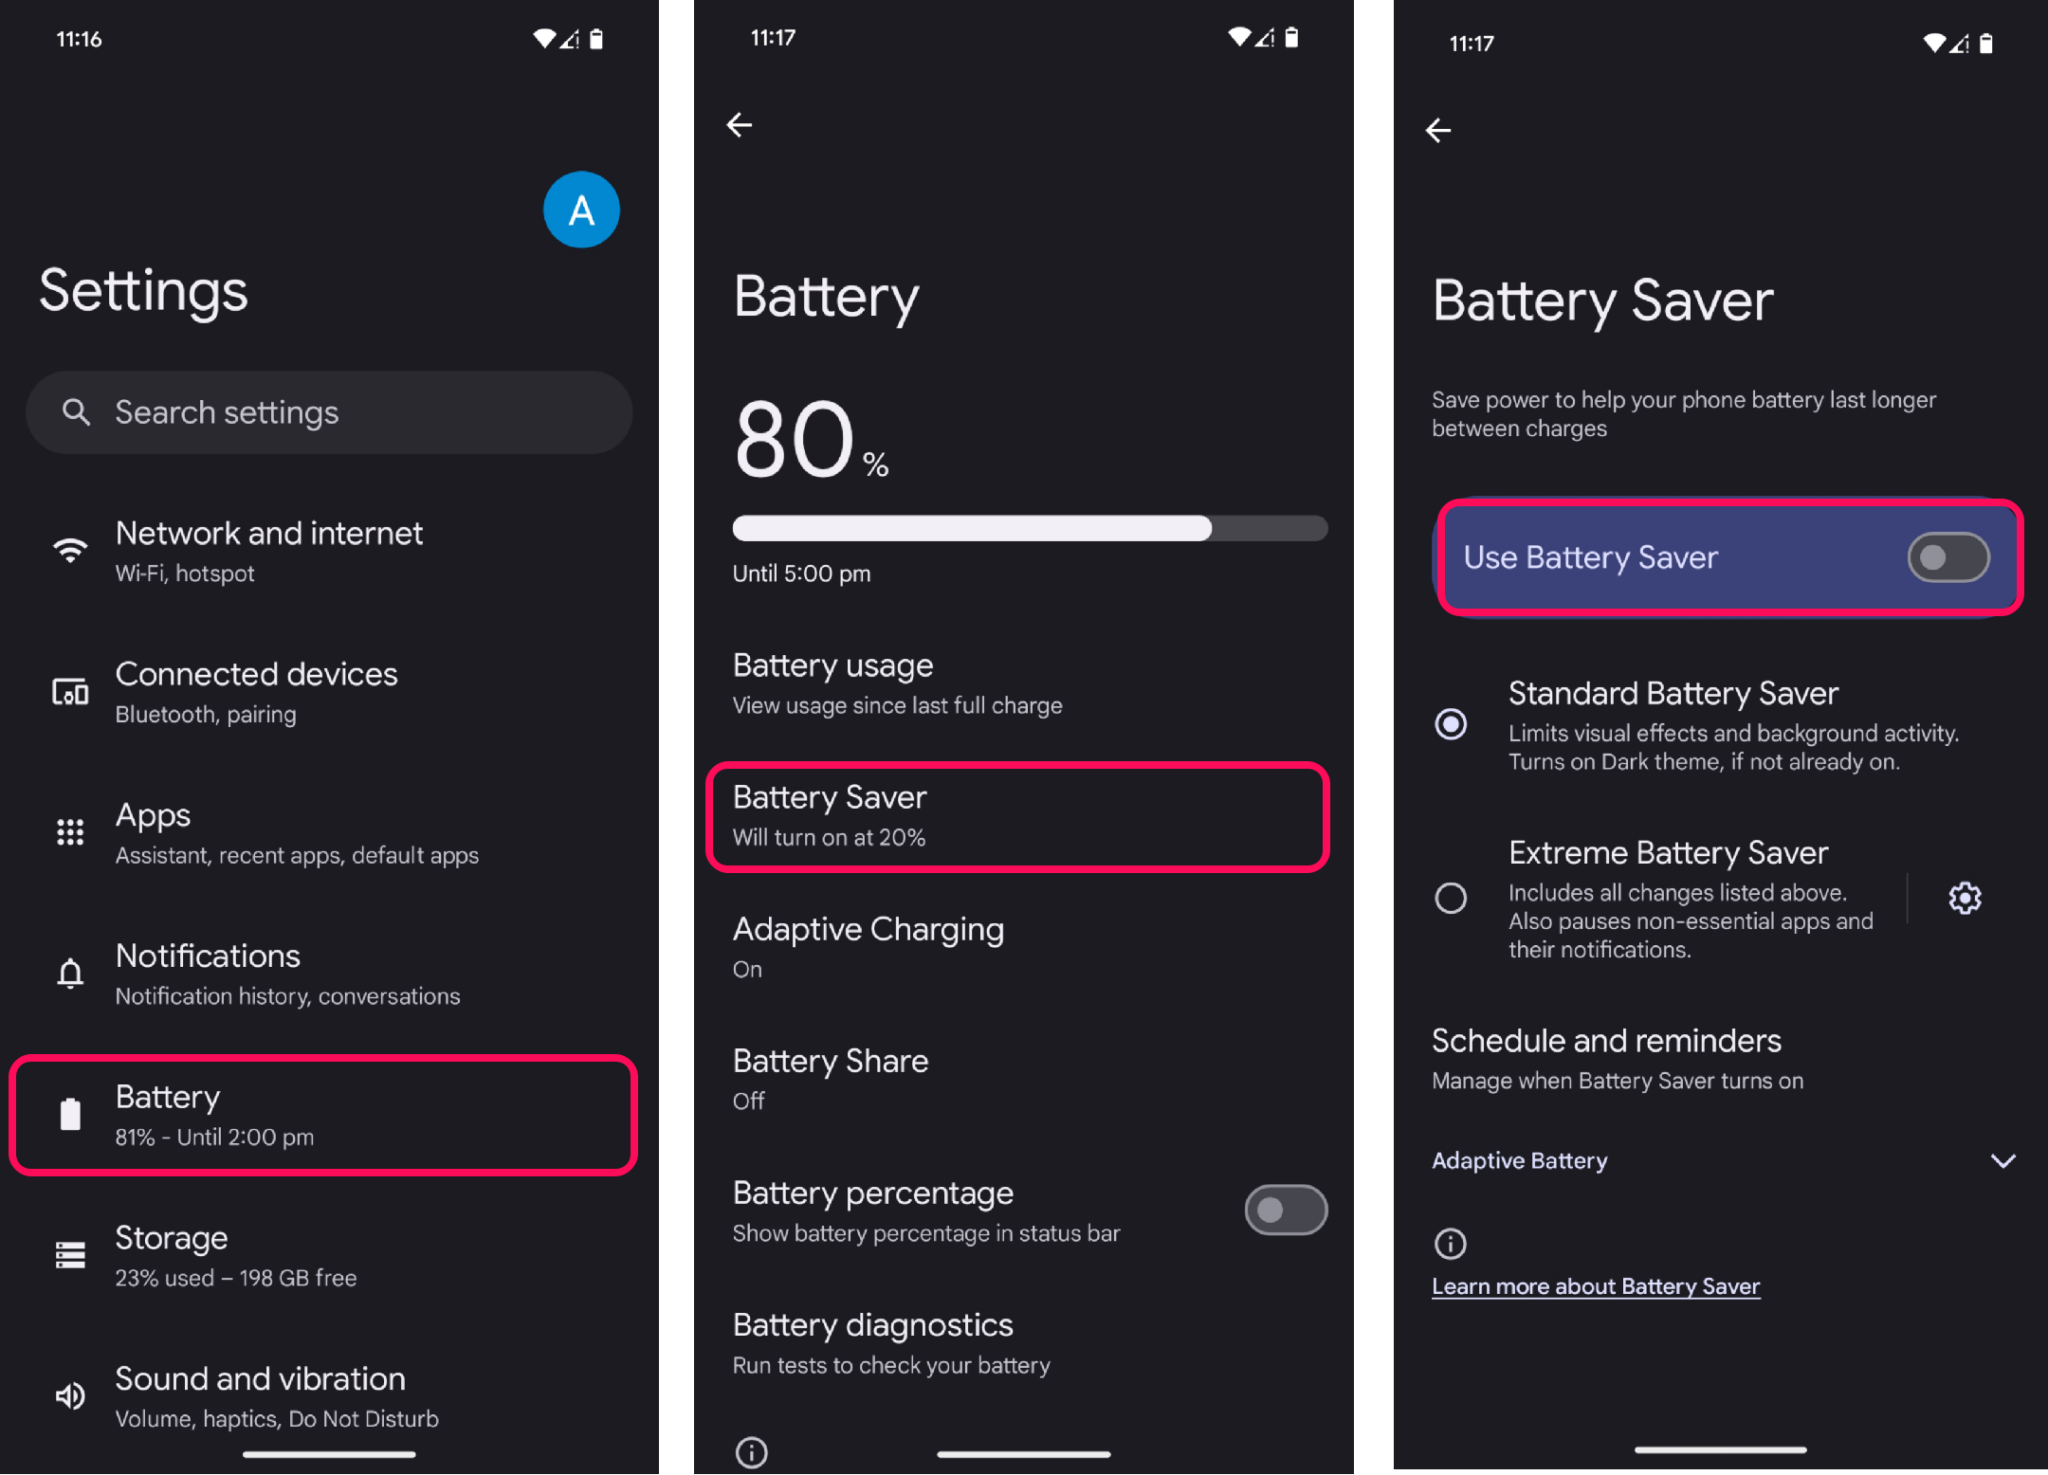
On the other hand, if you are having issues with particular app then ensure to unrestricted the app by following the below steps:
- Open the Settings app on your phone.
- Tap on Apps > See All Apps.
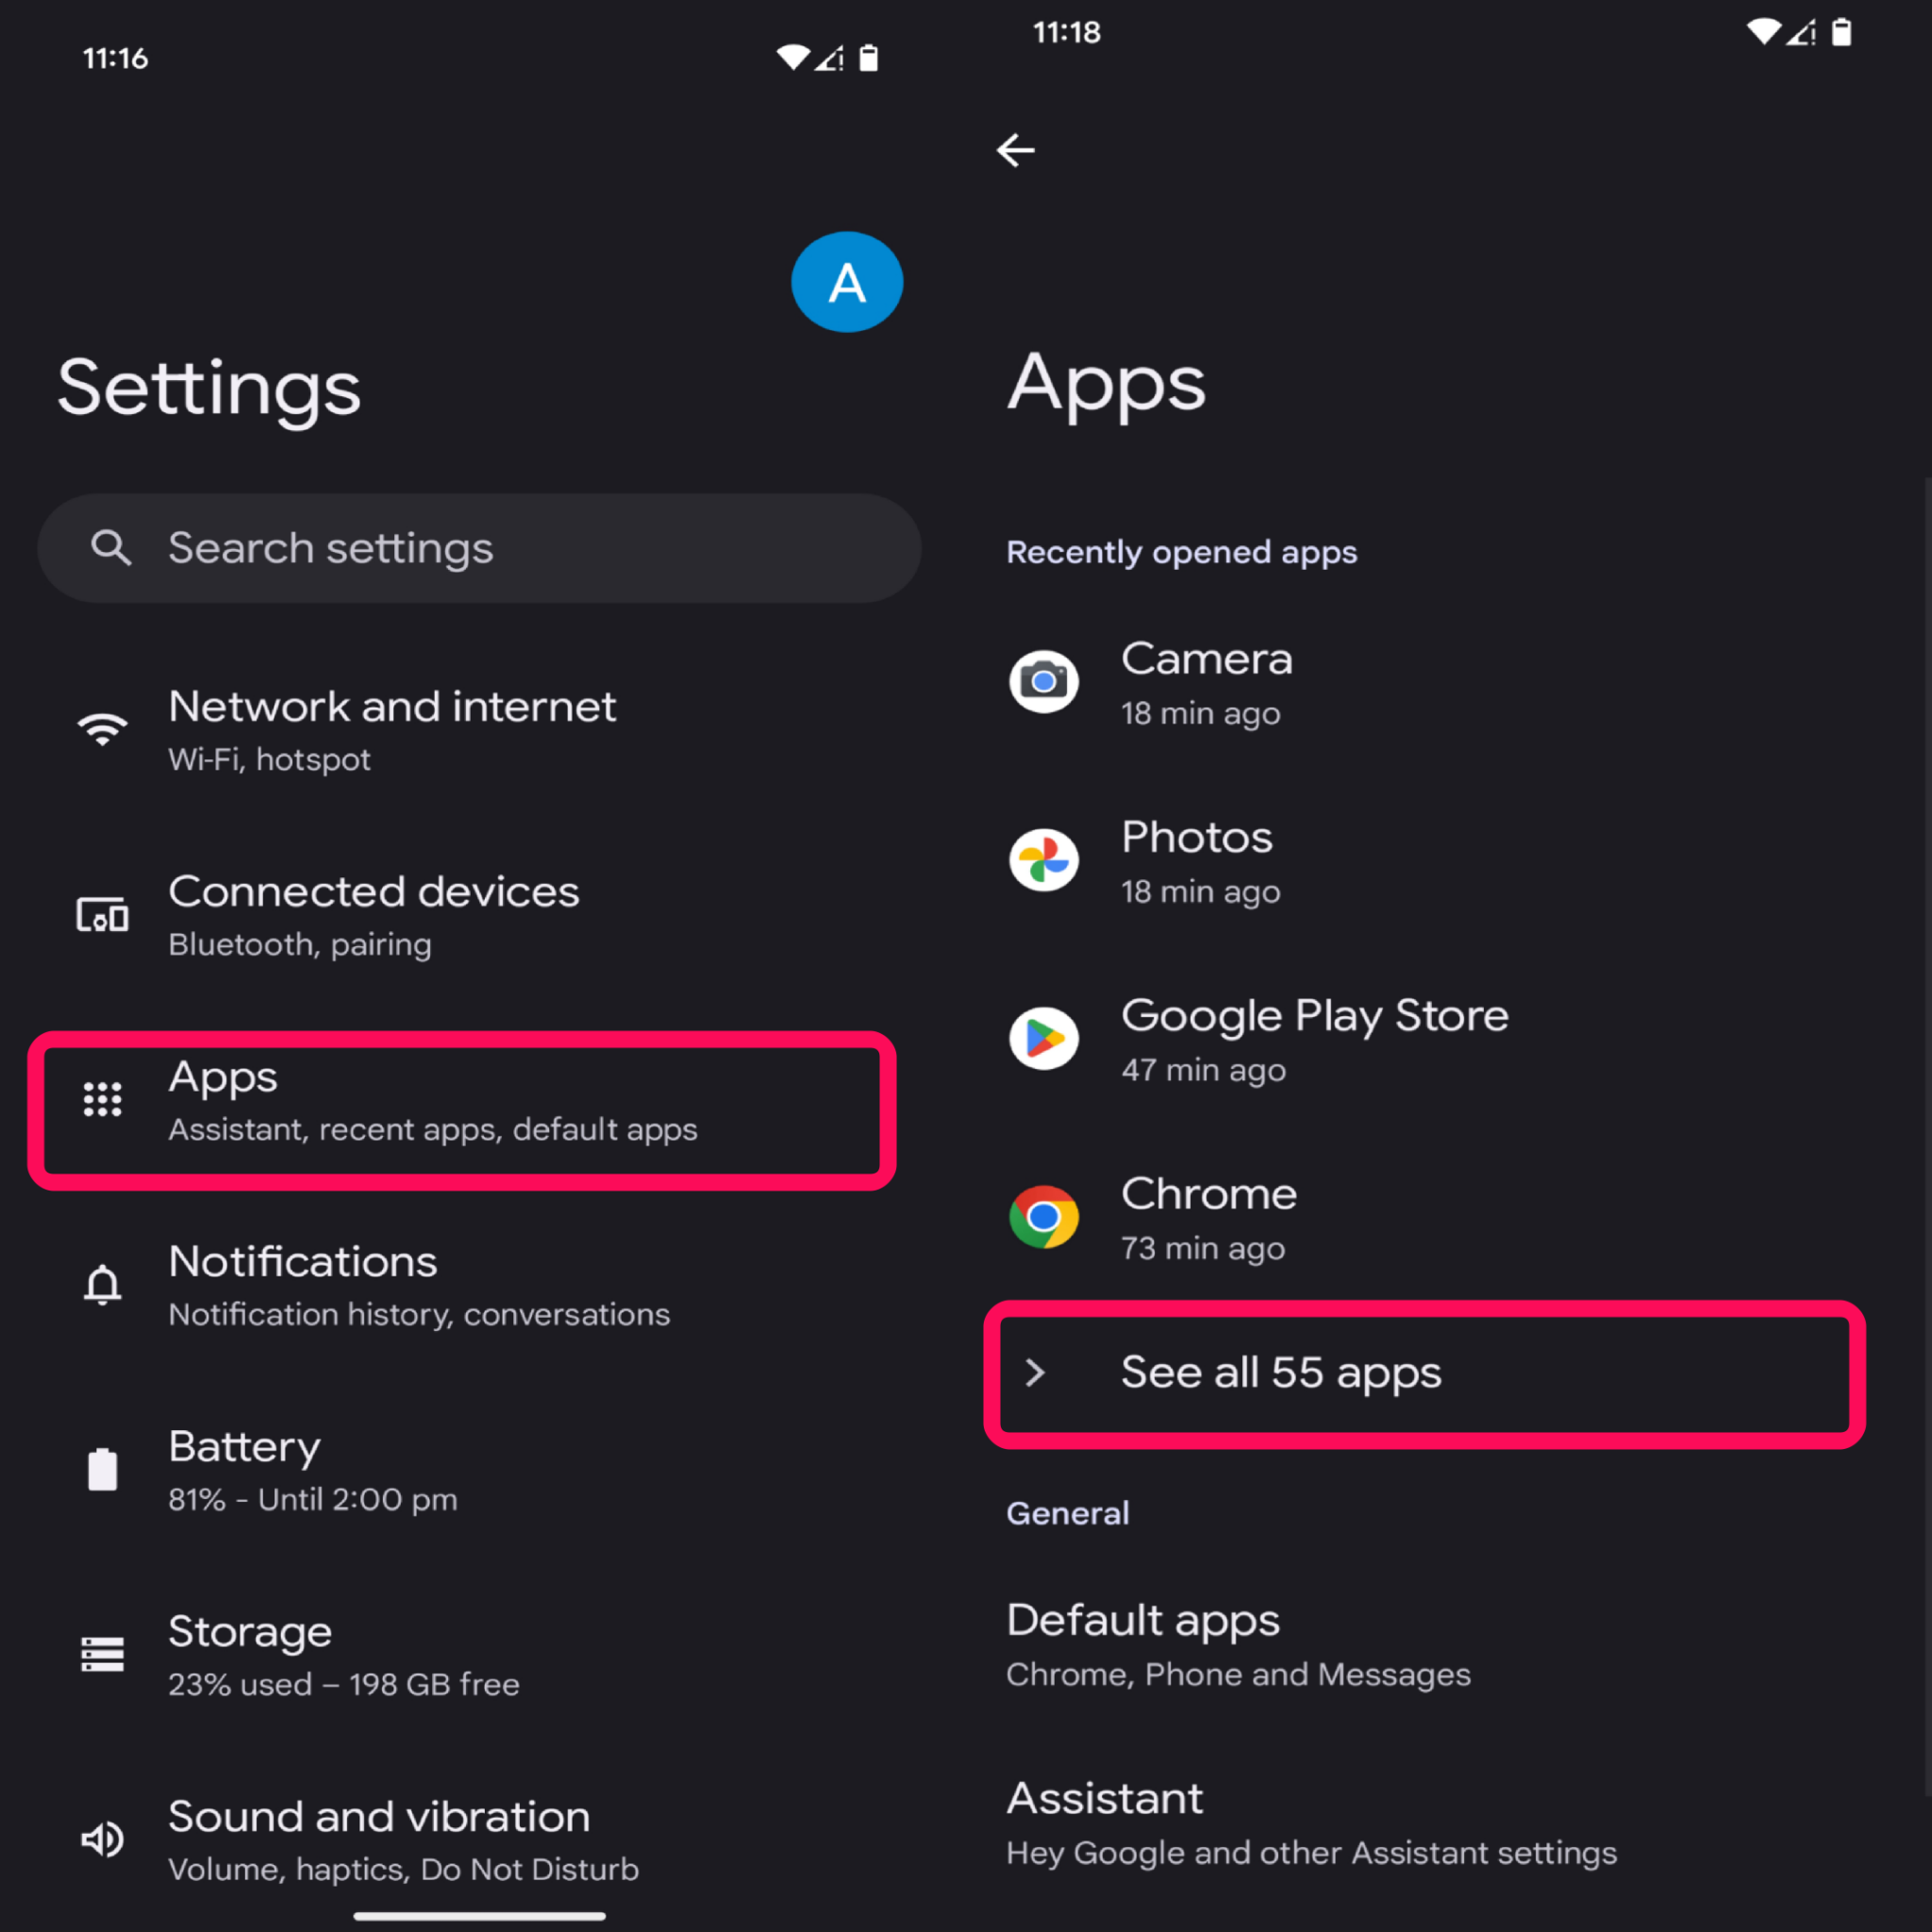
3. Find and select the app for which you want to disable battery saver.
4. Then, tap on App battery usage.
5. Finally, tap on Unrestricted button and that’s it.
Fix 12: Update Carrier Services
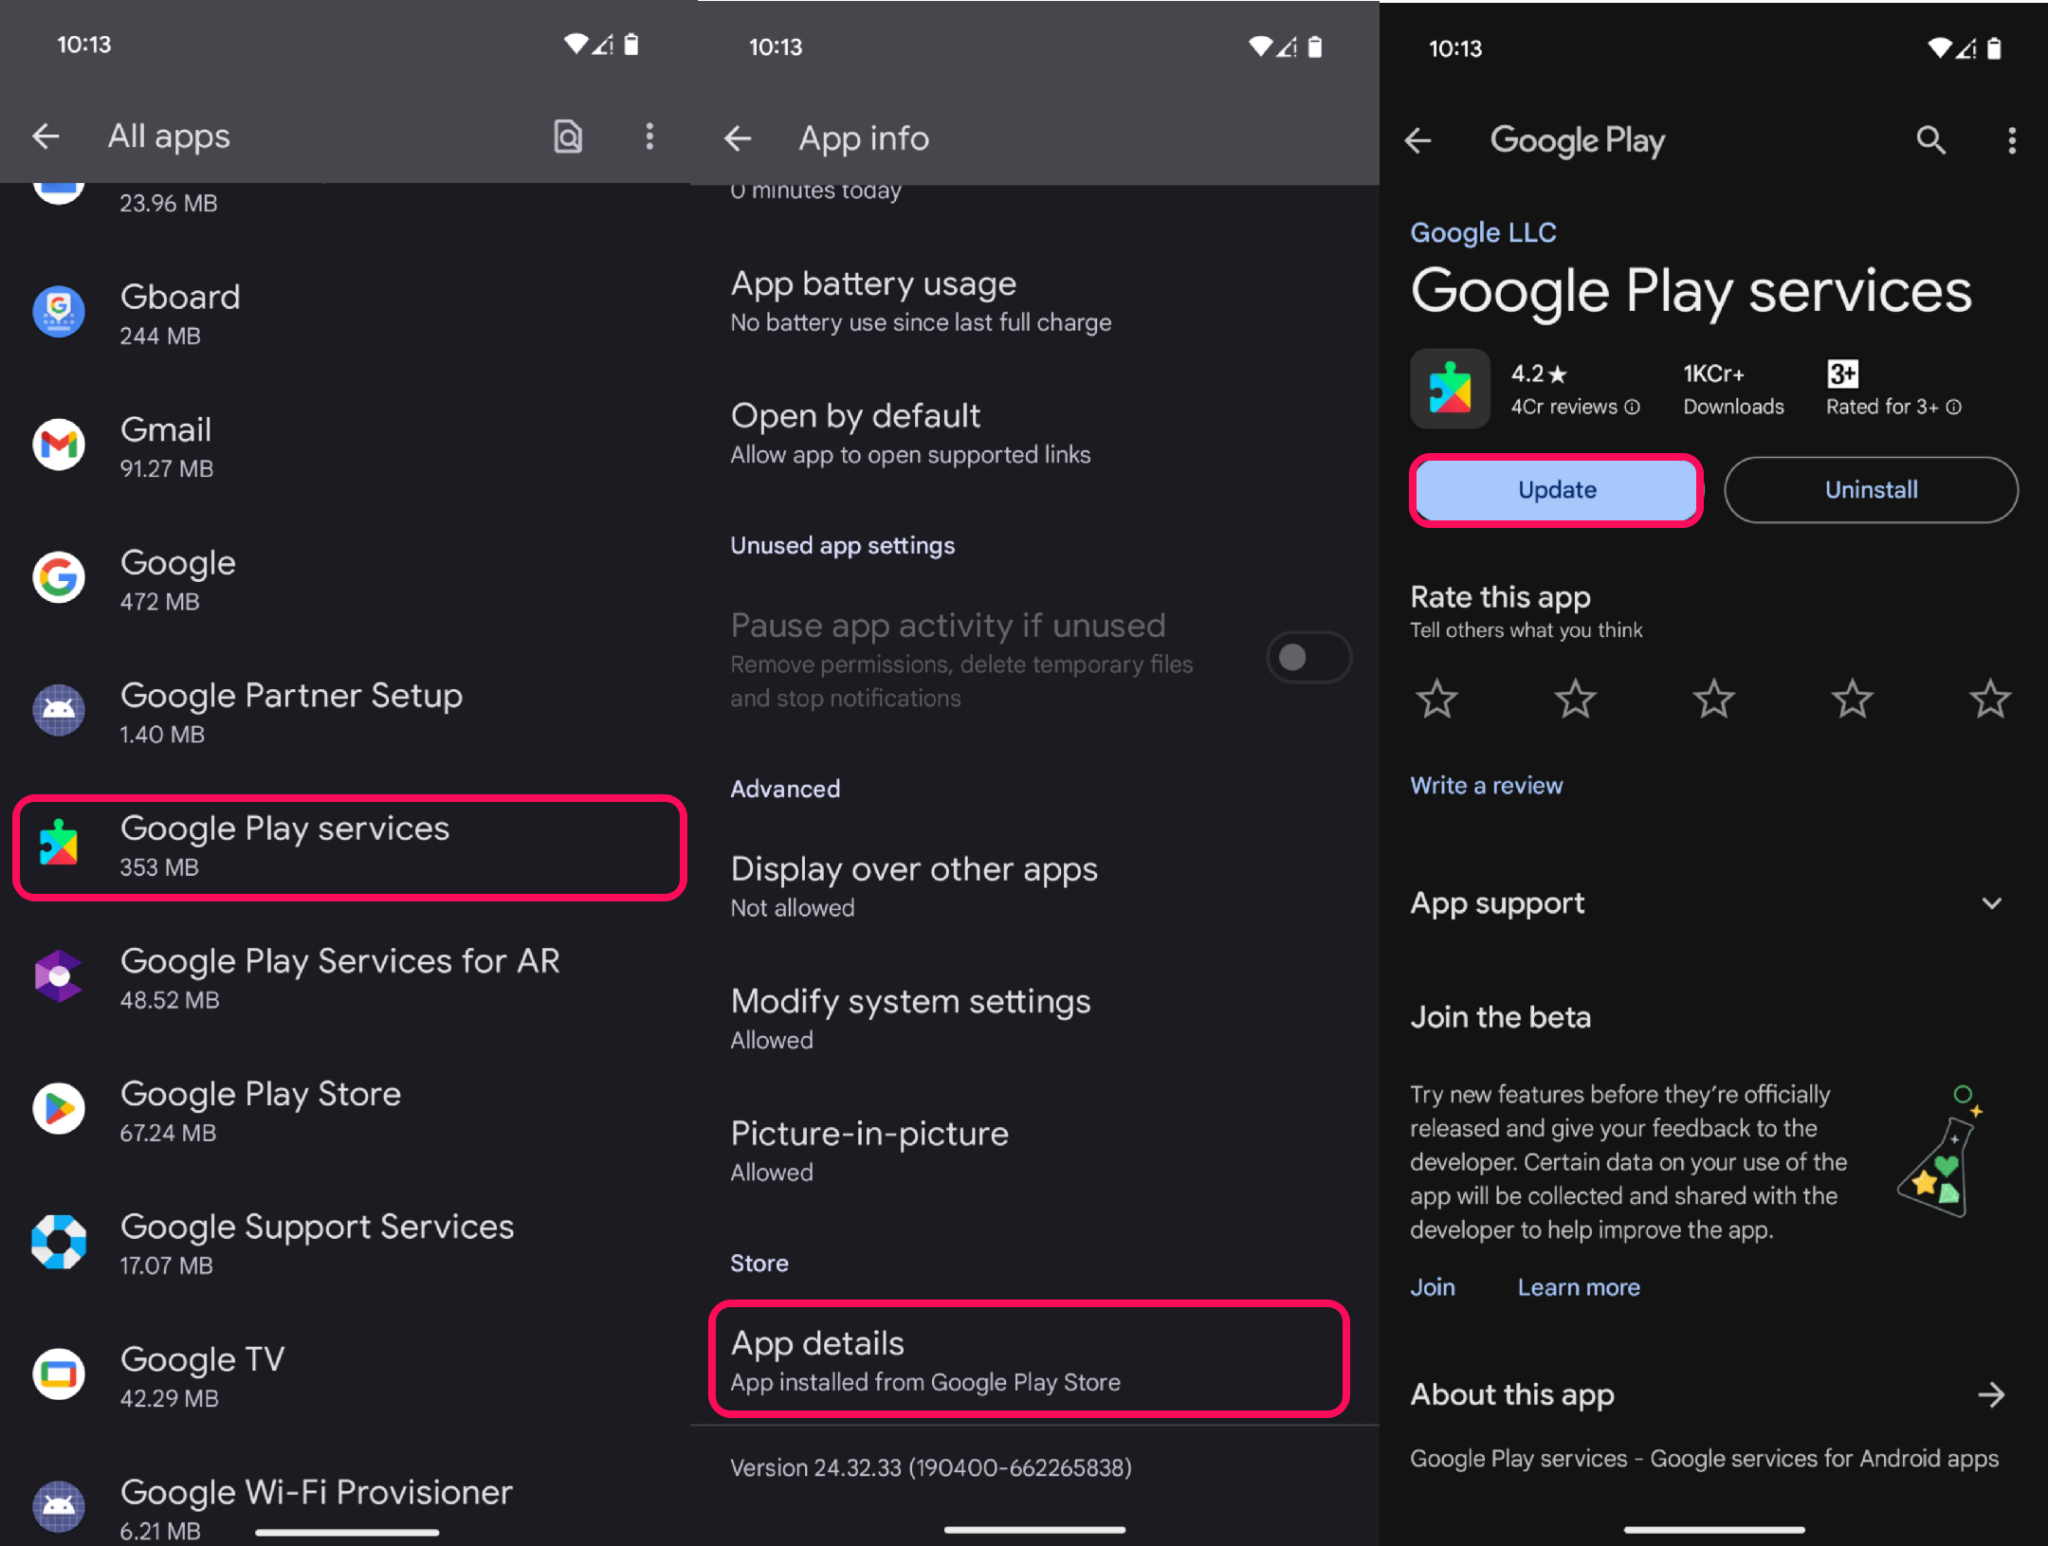
In most scenarios, the Carrier Service is automatically updated to the latest version with the latest monthly updates. However, in some cases, the service might not be updated and you would have to update the app manually to avoid technical issues or glitches. Here’s how you can update the carrier services:
- Head over to the Settings app on your device.
- Tap on Apps > See All Apps.

3. Scroll down and tap on Google Play Services.
4. Then, scroll to the bottom to see the app version.
5. Tap on App details and you will be directed to Google Play Services on the Play Store.
6. Finally, tap on the Update button to install the latest version.
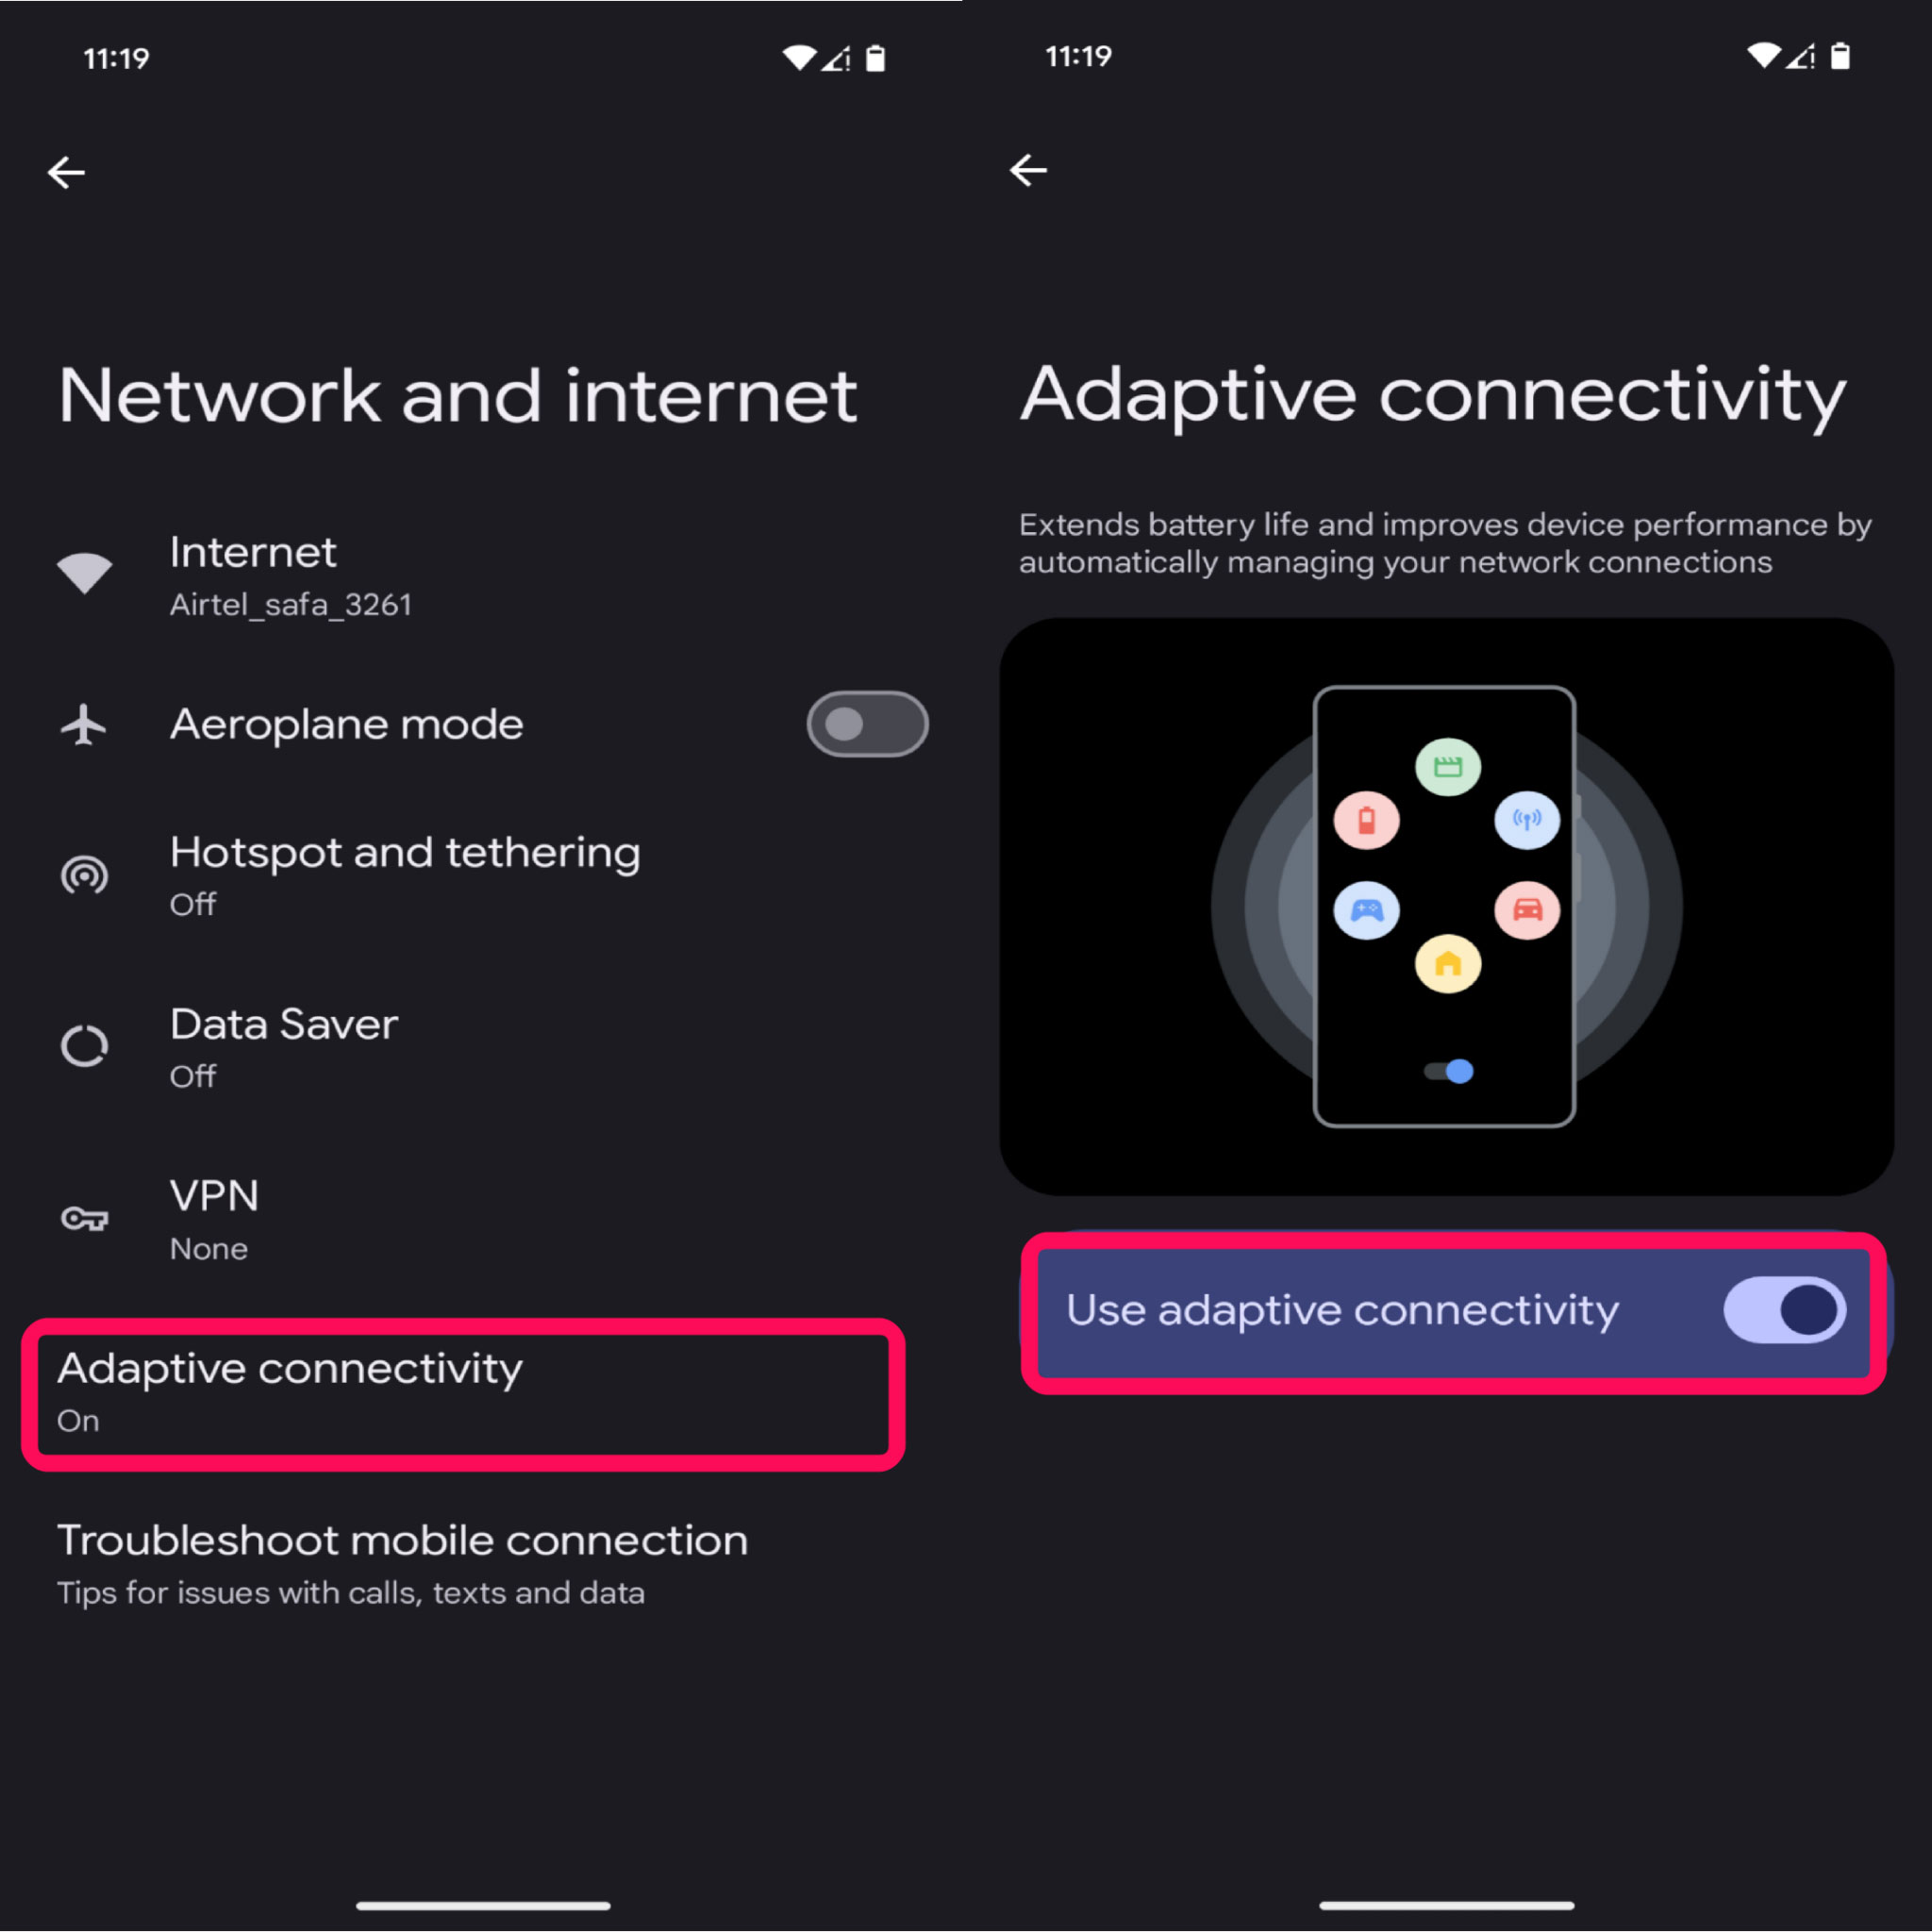
- Check if the issue has been solved with the Wi-Fi network.
Fix 14: Disable VPN Services
Virtual Private Networks (VPNs) encrypt data devolution over the internet which can interfere with the Wi-Fi network. It is best to disable any VPNs services you use on your mobile phone to address the issue. Follow the below steps to disable the VPN service on Android 15:
- Head over to the Settings app on your device.
- Tap on Network and internet.
- Then, tap on VPN.
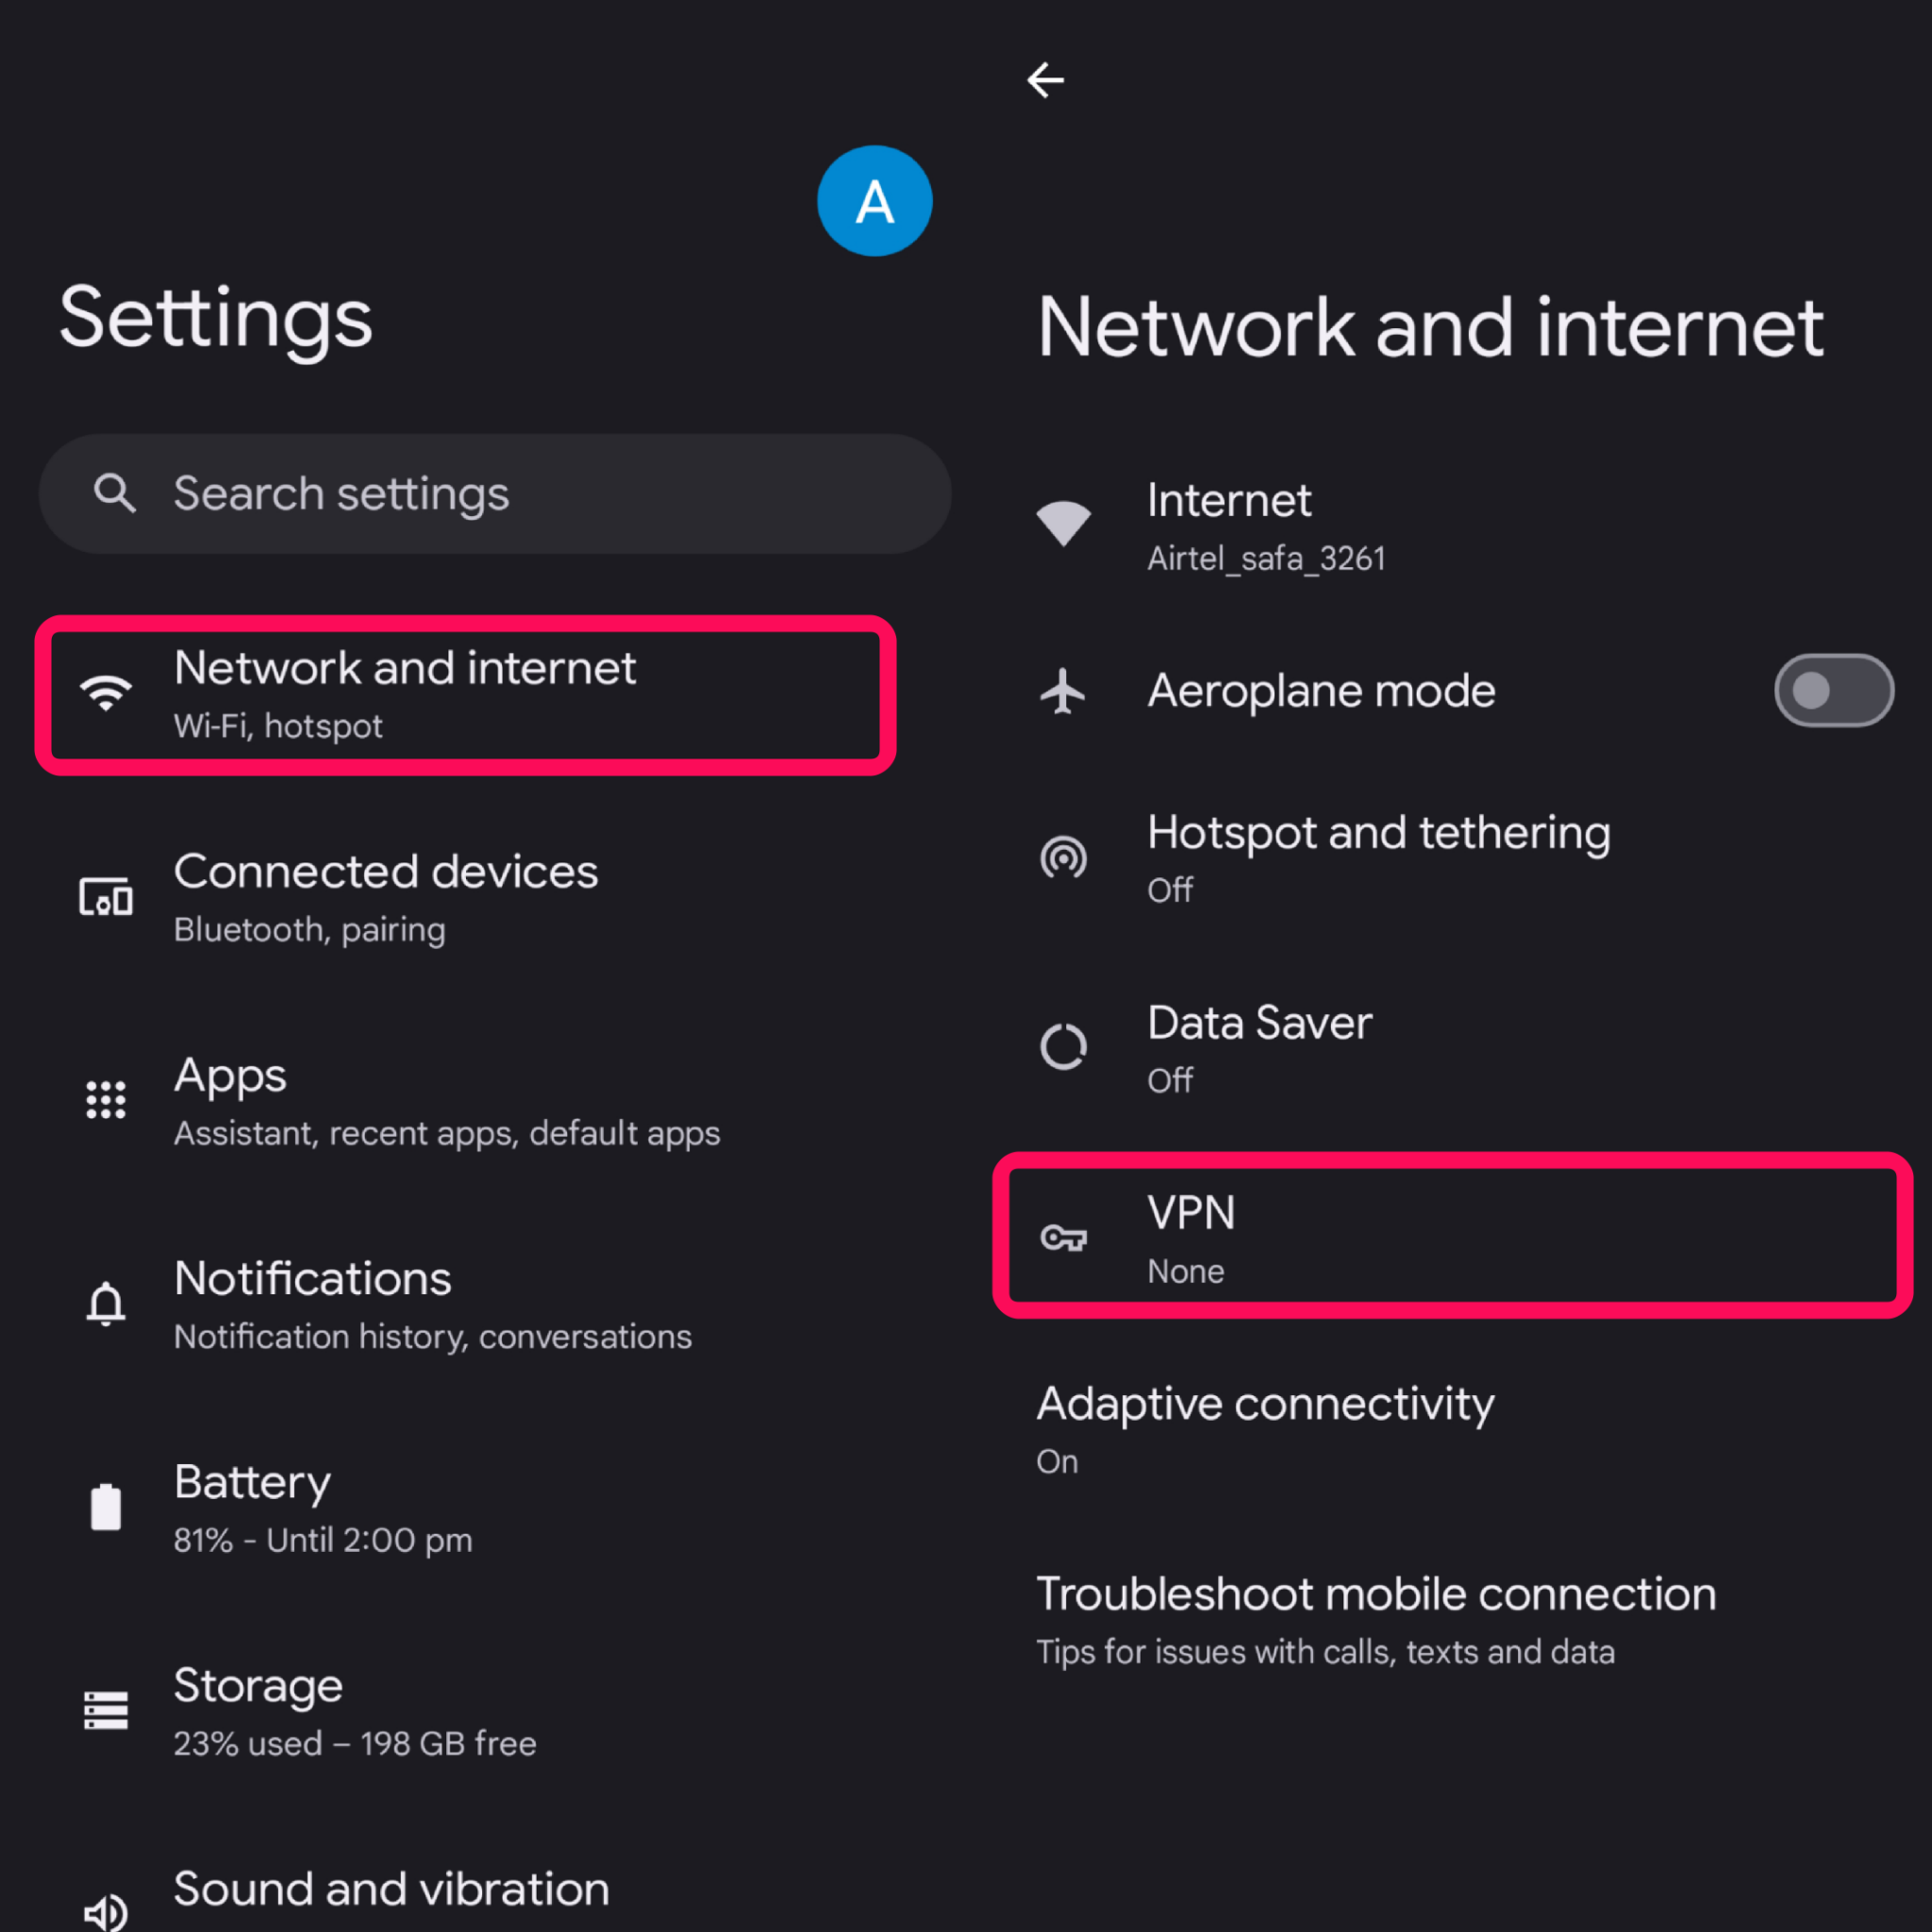
4. Now select the active VPN service by tapping on the gear icon next to it.
5. From there, tap on Forget VPN and tap Forget to confirm it.
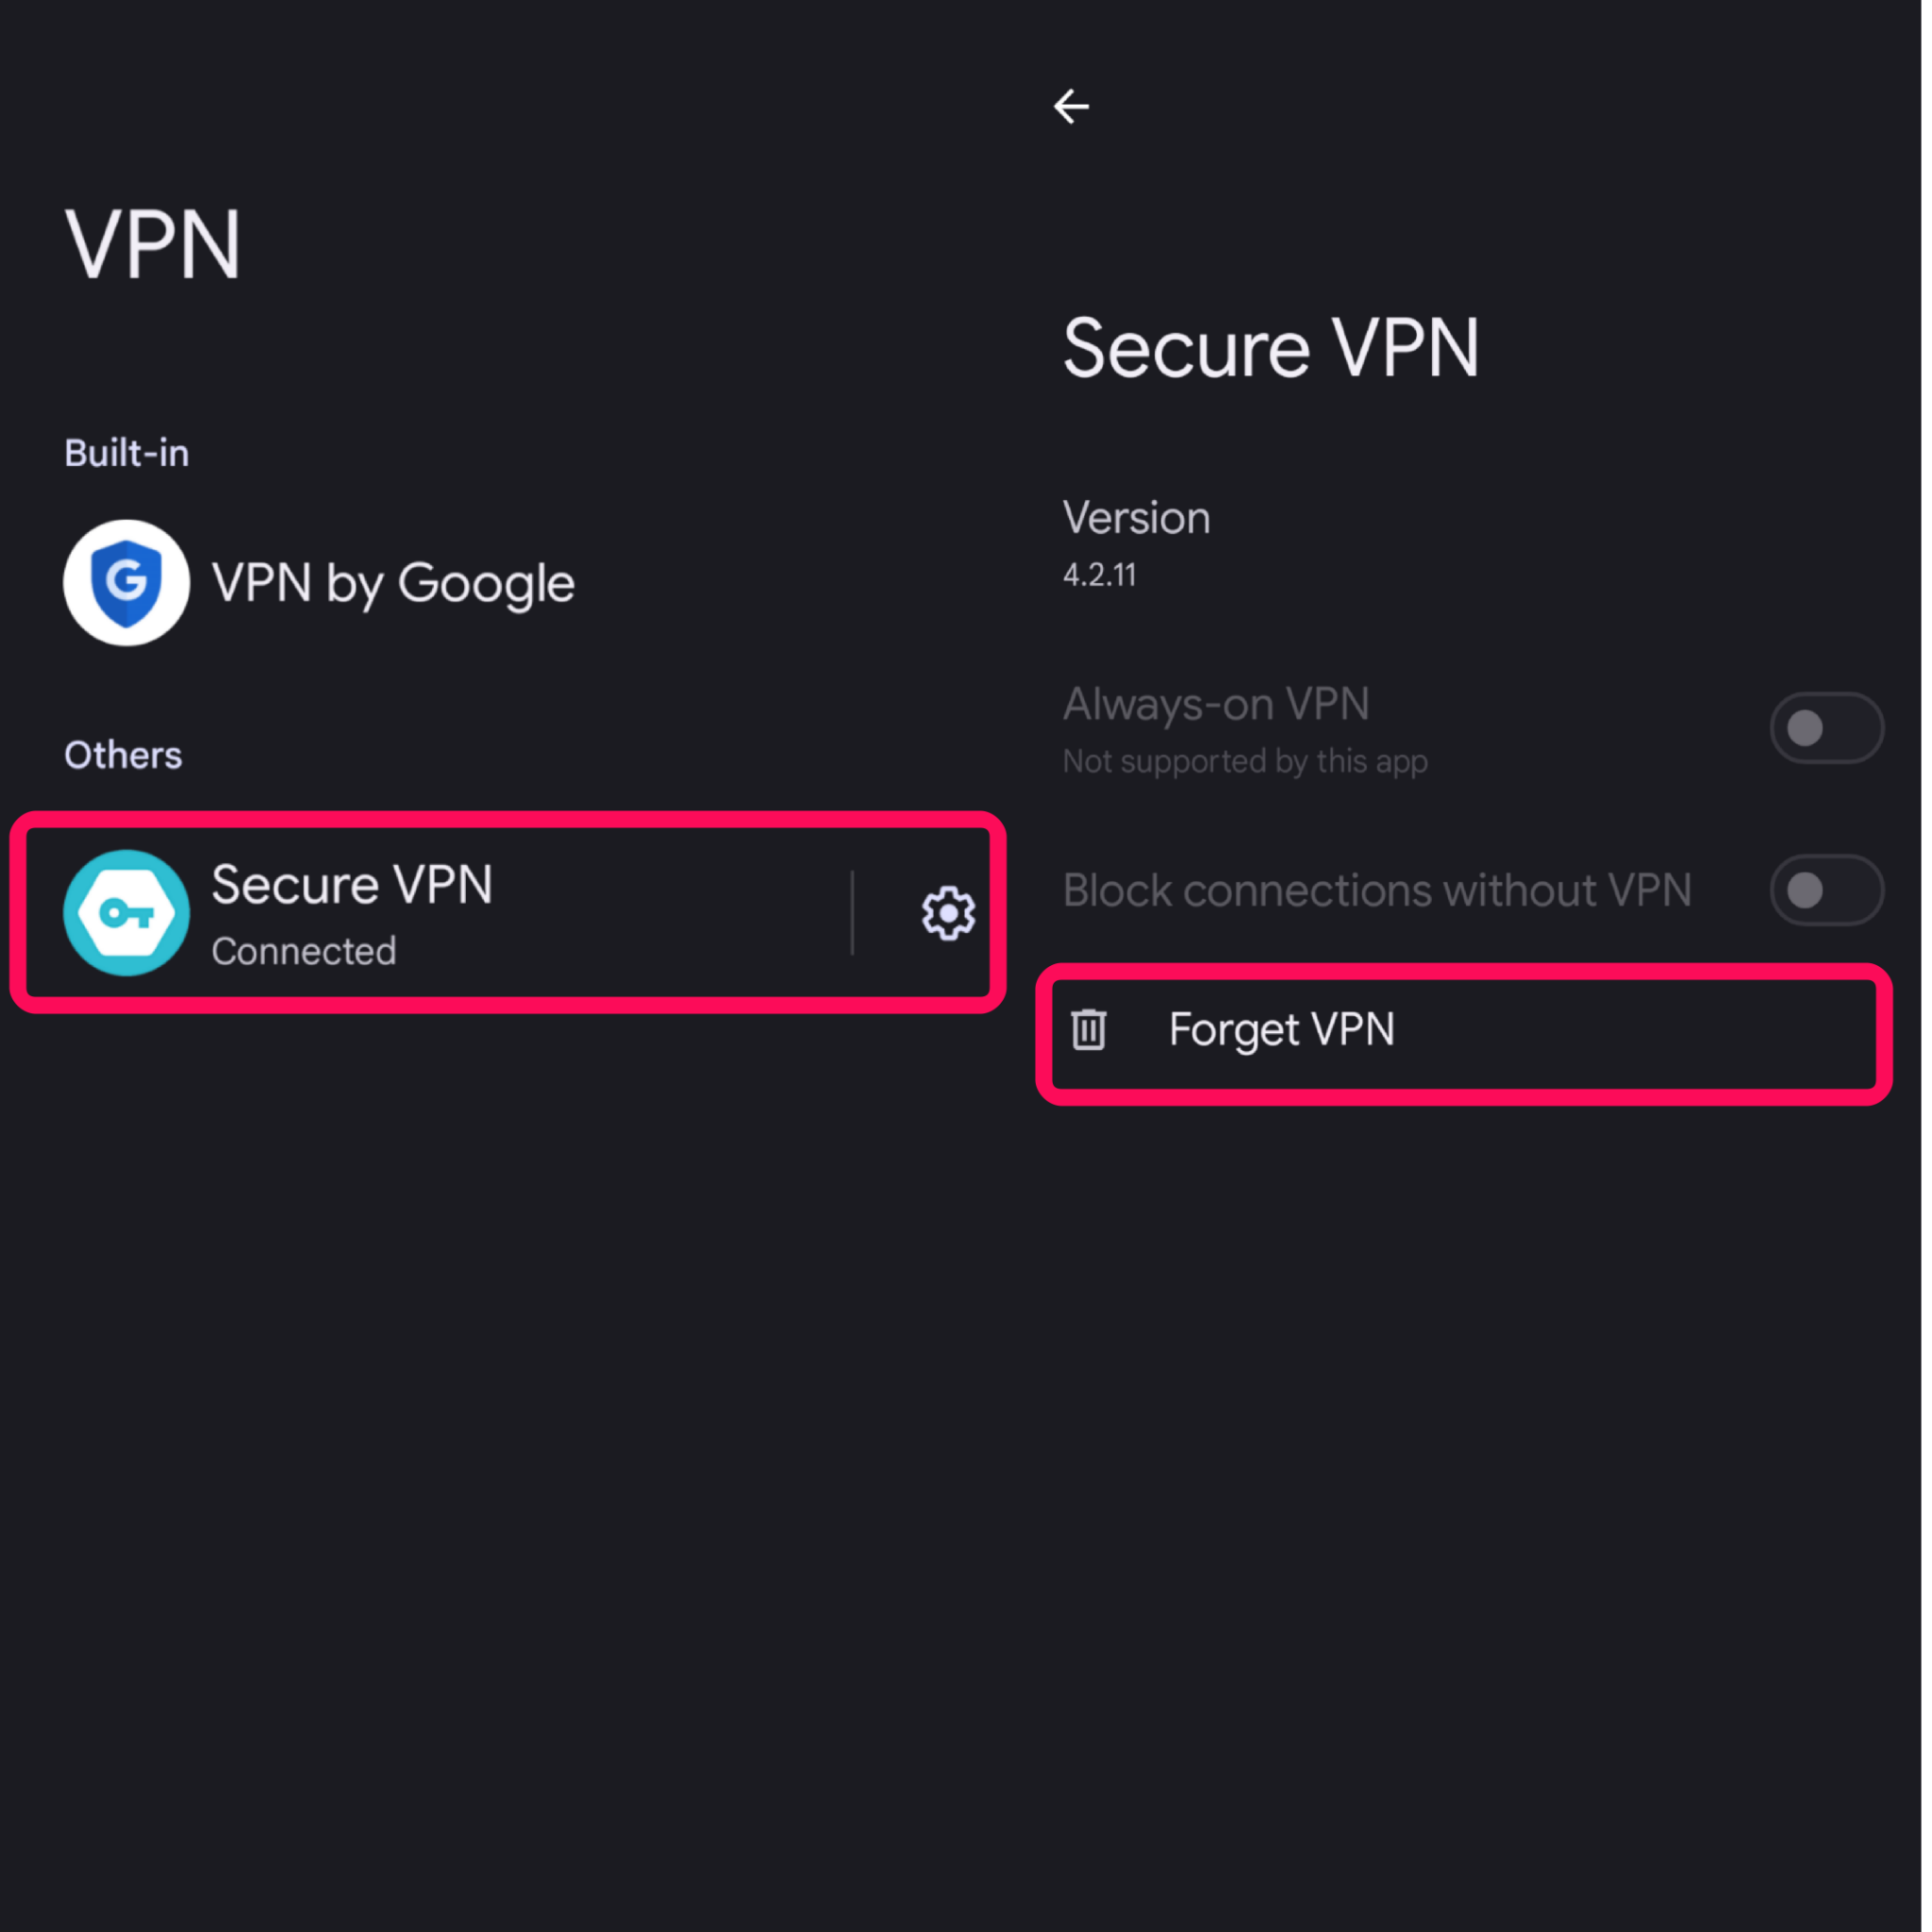
Alternatively, you can directly turn off the VPN from the VPN app itself to check if the Wi-Fi not working issue has been solved.
Fix 15: Disable Mobile Data Always Active
You have to access this feature from the developer option and consider it disabling it. This feature lets you switch on the mobile data as always, even if you are connected with the Wi-Fi network. This is typically applied for a faster network switch but there’s a side down too.
If you’ve turned on this feature, your device would be able to directly switch over the carrier data without any delay. So, if you are connected with the Wi-Fi, then it can’t provide you with a stable network and strength. Make sure to disable it from the developer settings. Here’s how:
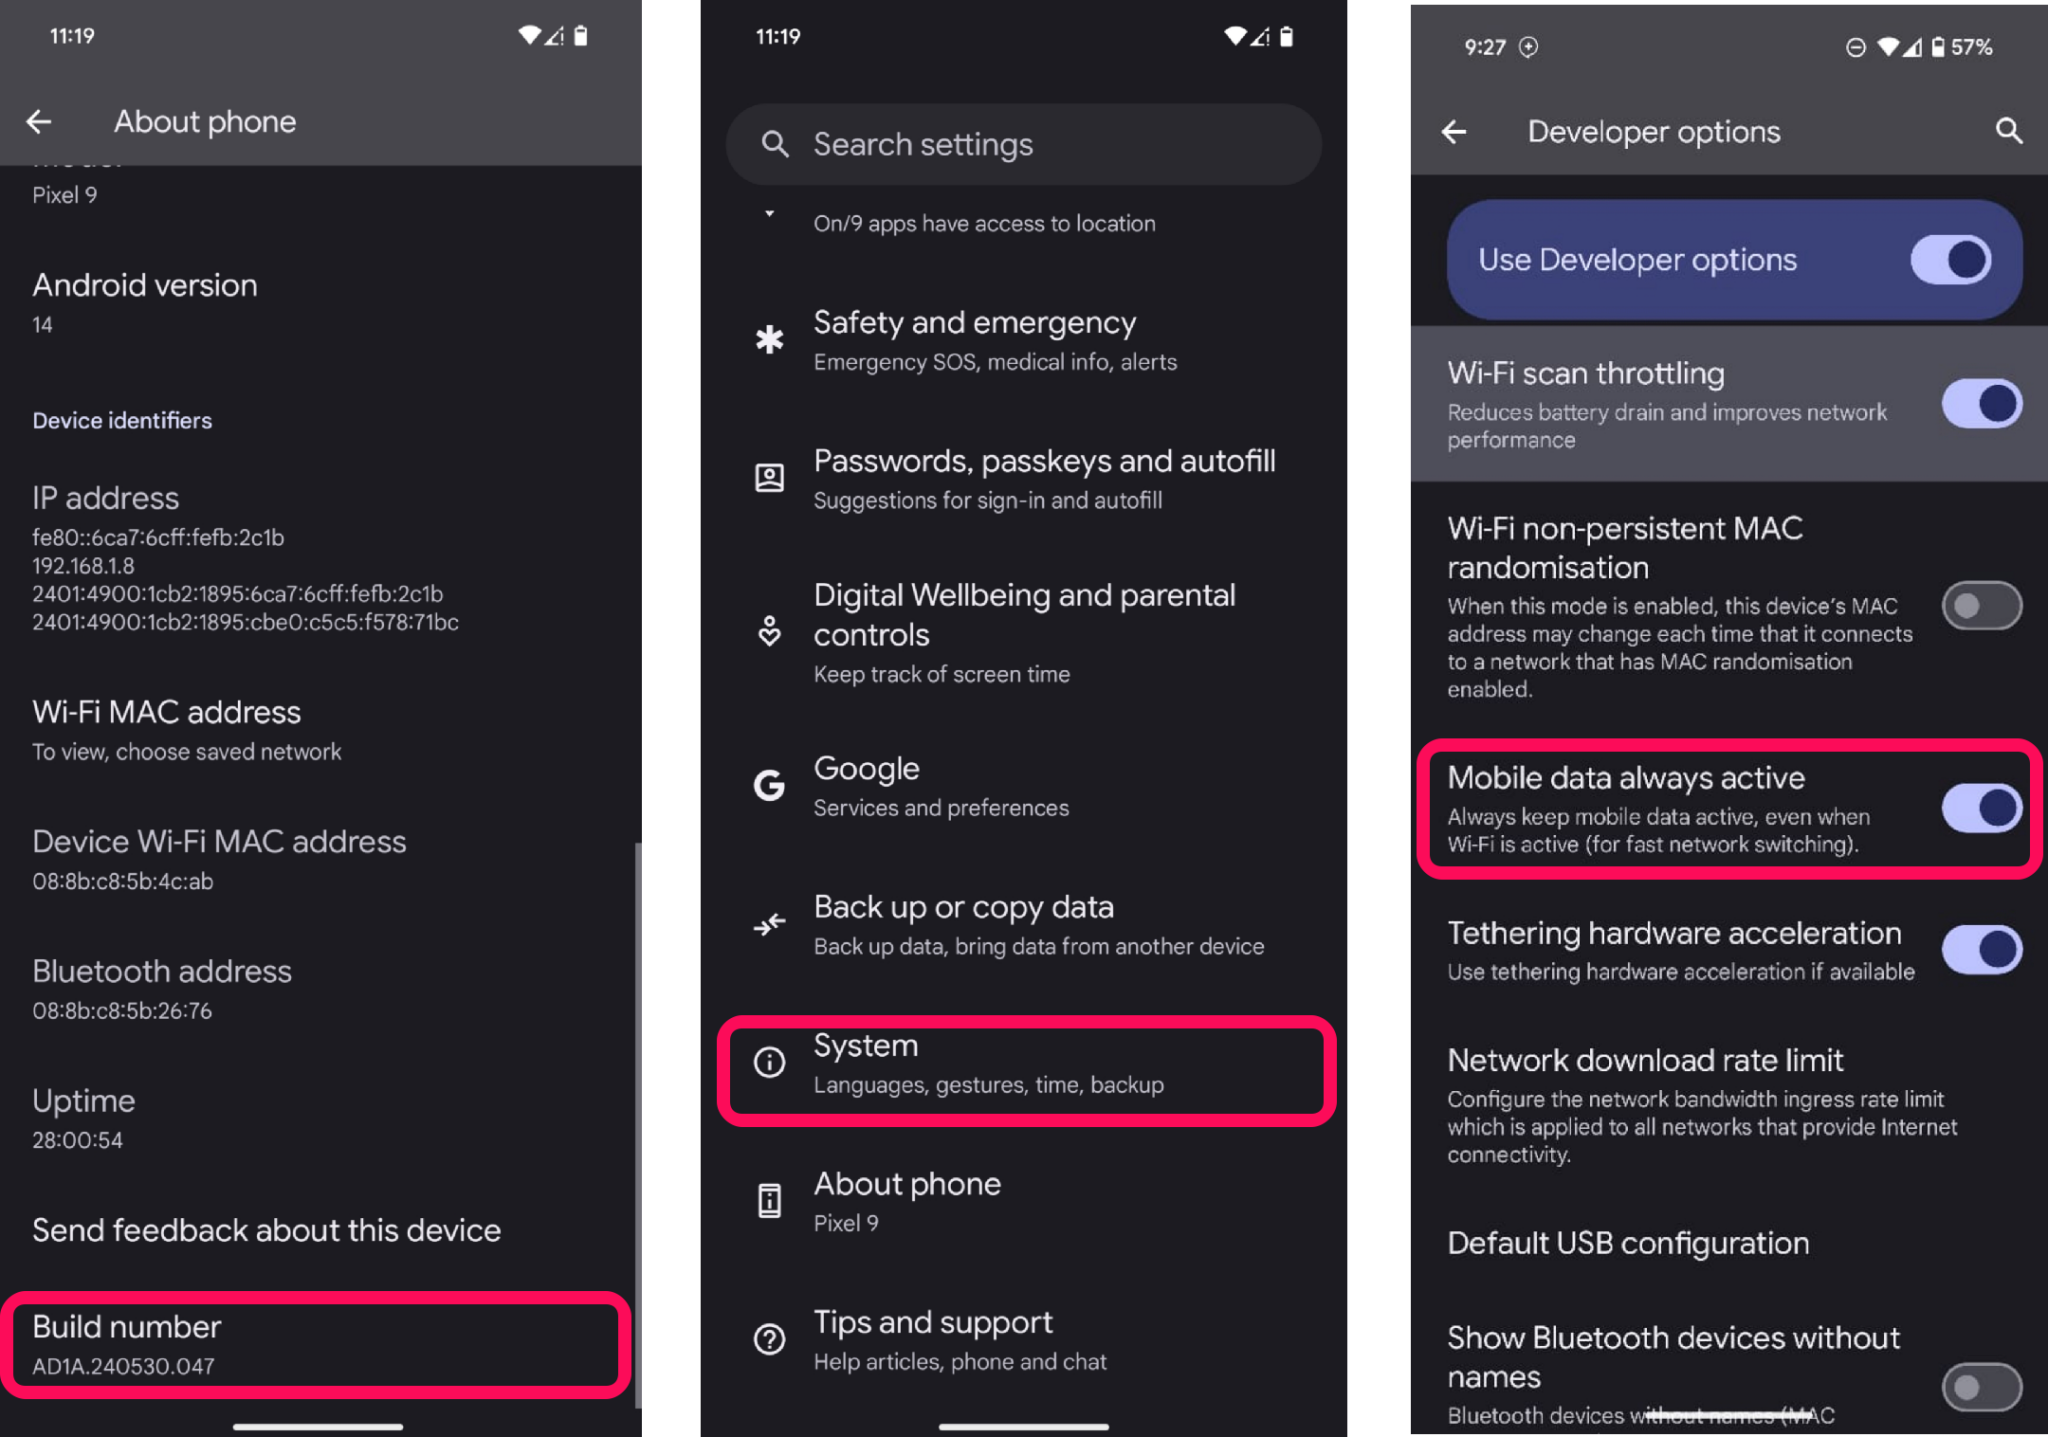
- Open the Settings app on your device.
- Tap on About phone and scroll down to the bottom.
- Then, tap on Build number for 7 times to enable Developer option.
- Go back and tap on System to access the Developer Options.
- Scroll down to Mobile Data Always Active and turn off the toggle.
Fix 16: Reset Network Settings
If you have tried the above methods related to network settings and it doesn’t work for you, then there’s something else regarding the issue. However, it can be possible that the stored network data gets corrupted and it’s actually then this can affect the entire network configuration, resulting in network related issues.
The only method you can try to address the problem is to reset network settings which usually reset all the network settings to its default state. Keep in mind that the network settings will be completely erased including saved Wi-Fi networks.
Here’s how you can reset network settings on Android 15 device:
- Open the Settings app on your phone.
- Scroll down and tap on System.
- Then, tap on Reset options.
- Next, select Reset mobile network settings.
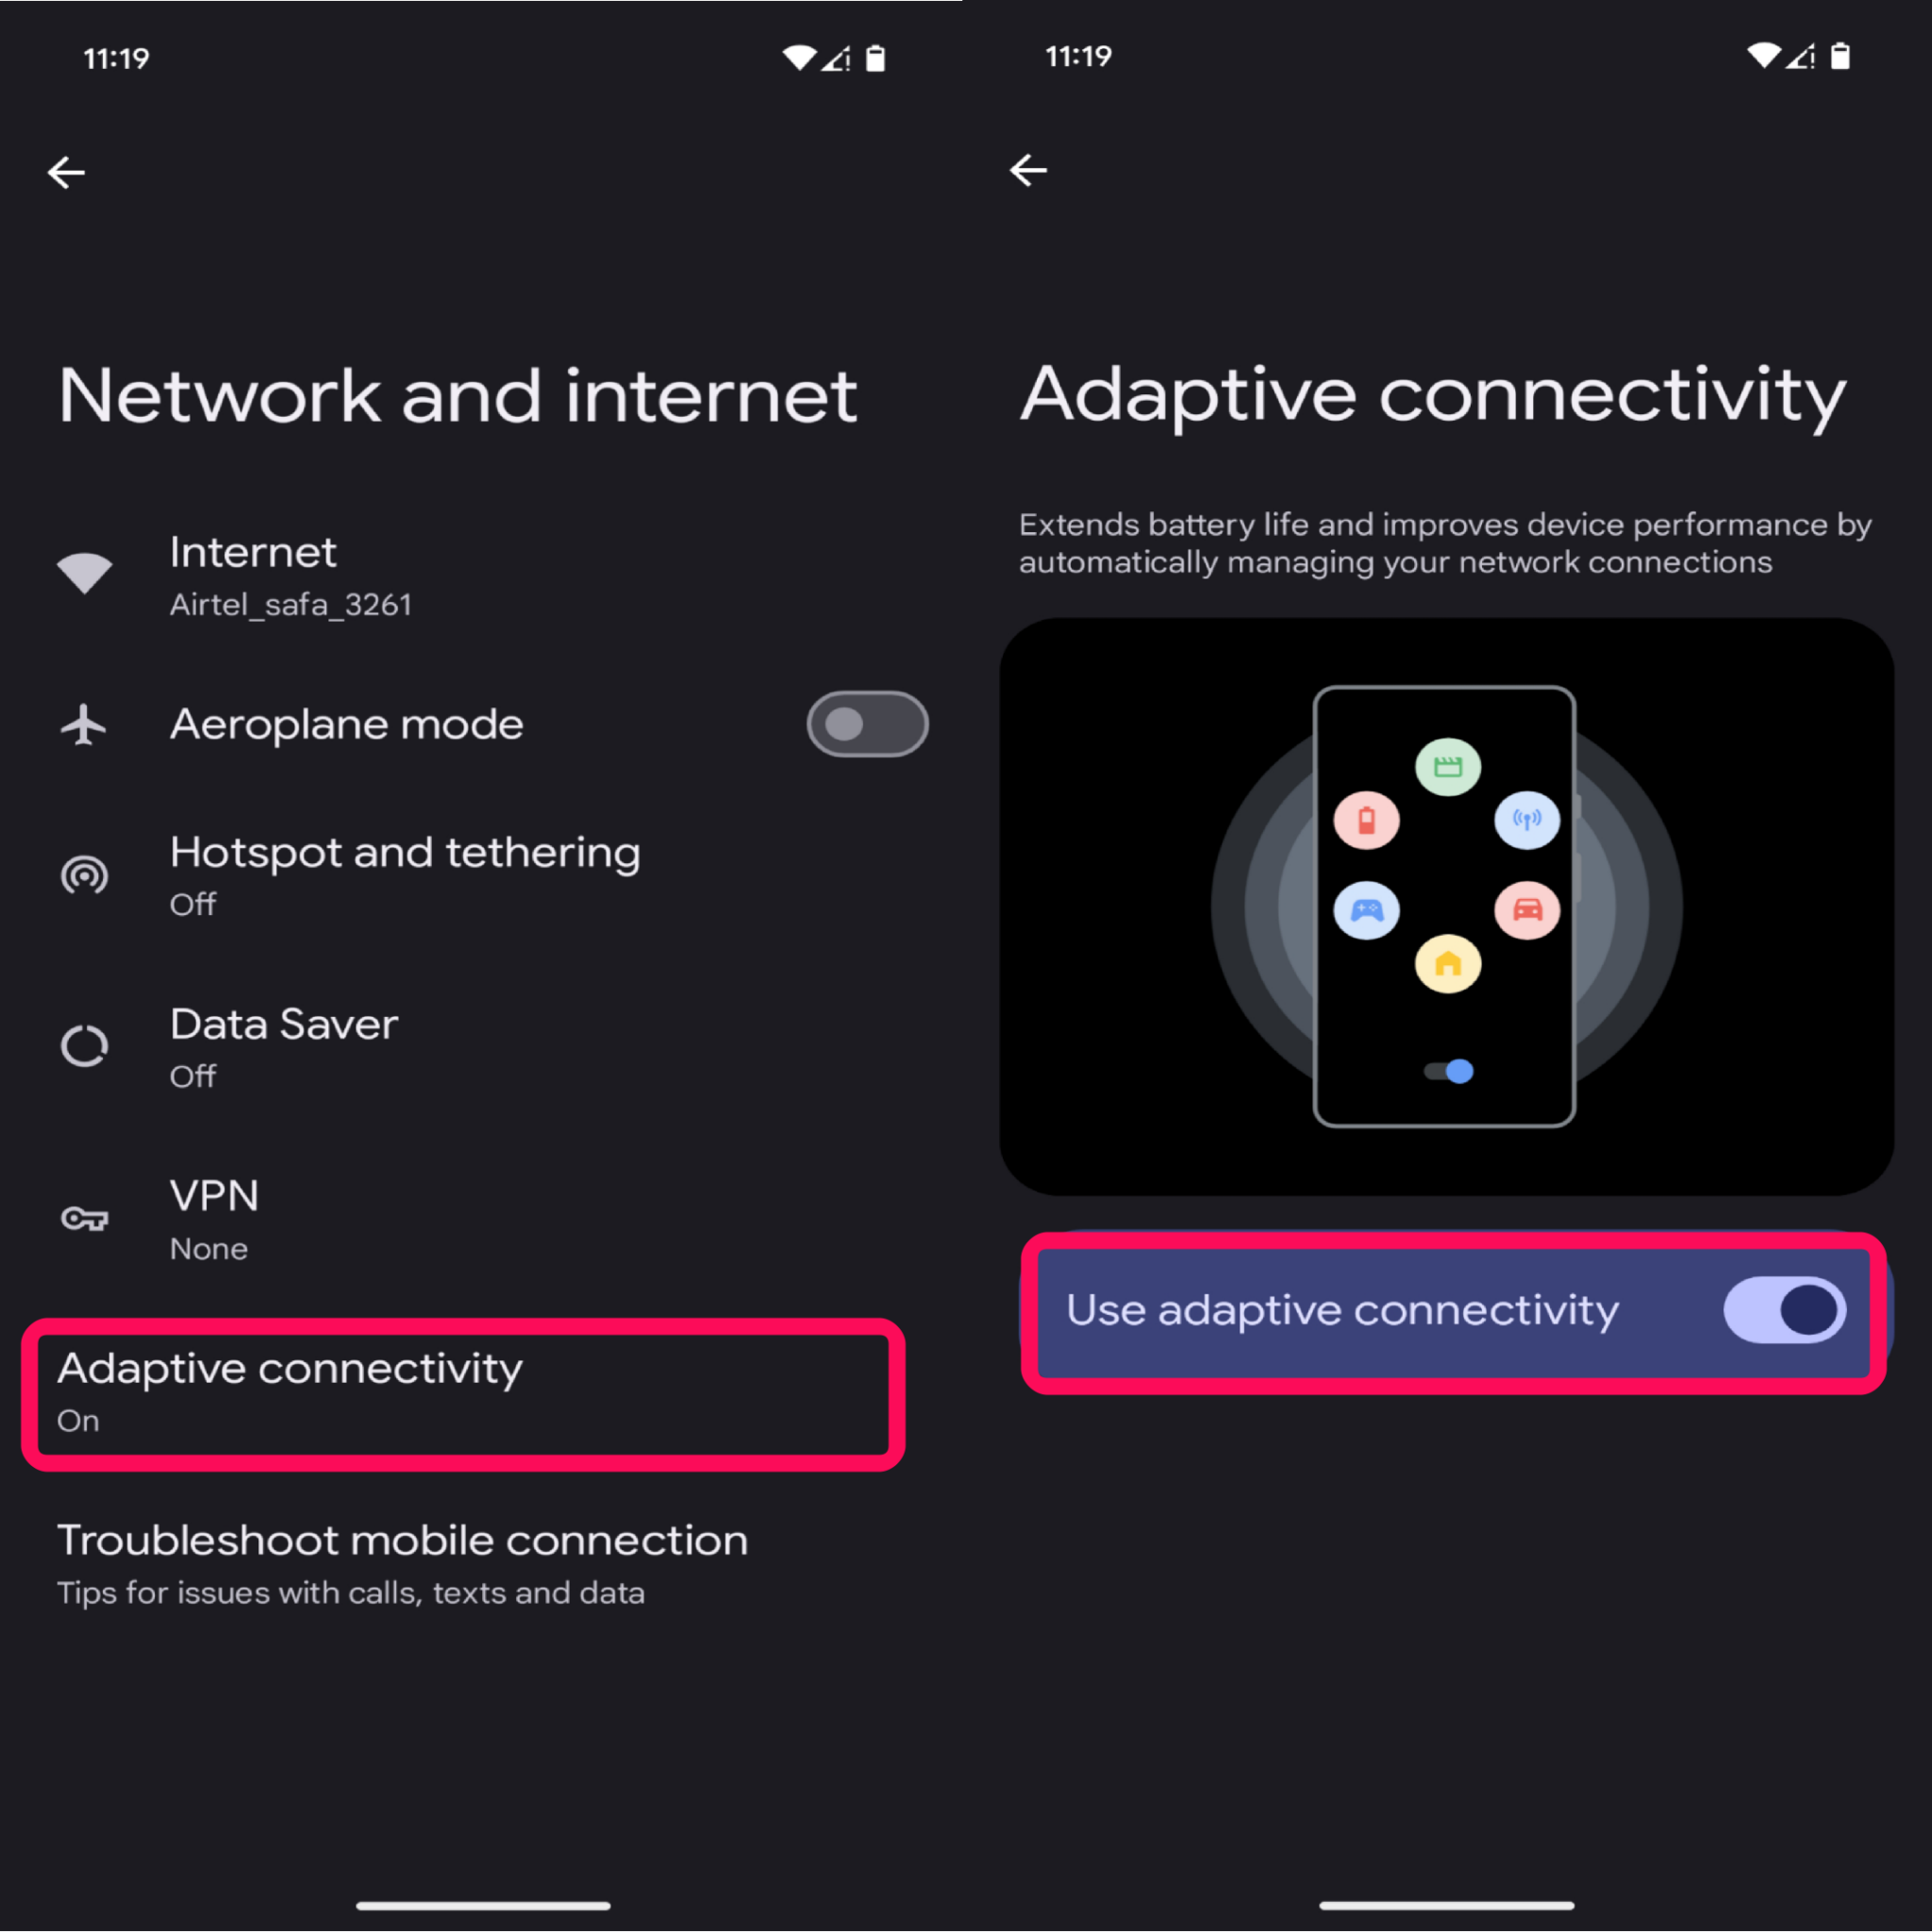
- 5. Finally, click on Reset settings and enter your PIN to proceed and wait for the process to complete.
Fix 17: Perform a Factory Reset
If the aforementioned methods don’t work for you then you should perform a factory reset to rectify the issue related to network connection. This will resolve all the issues related to softwares and systems including Wi-Fi not working.
By performing the factory reset, the phone data will be completely erased including the photos, videos, contacts, and other crucial documents. Make sure to take a complete backup before proceeding to this method.
Once you are ready with a backup, you can proceed with this method by following the below steps:
- Open the Settings app on your phone.
- Scroll down and tap on System.
- Then, tap on Reset options.
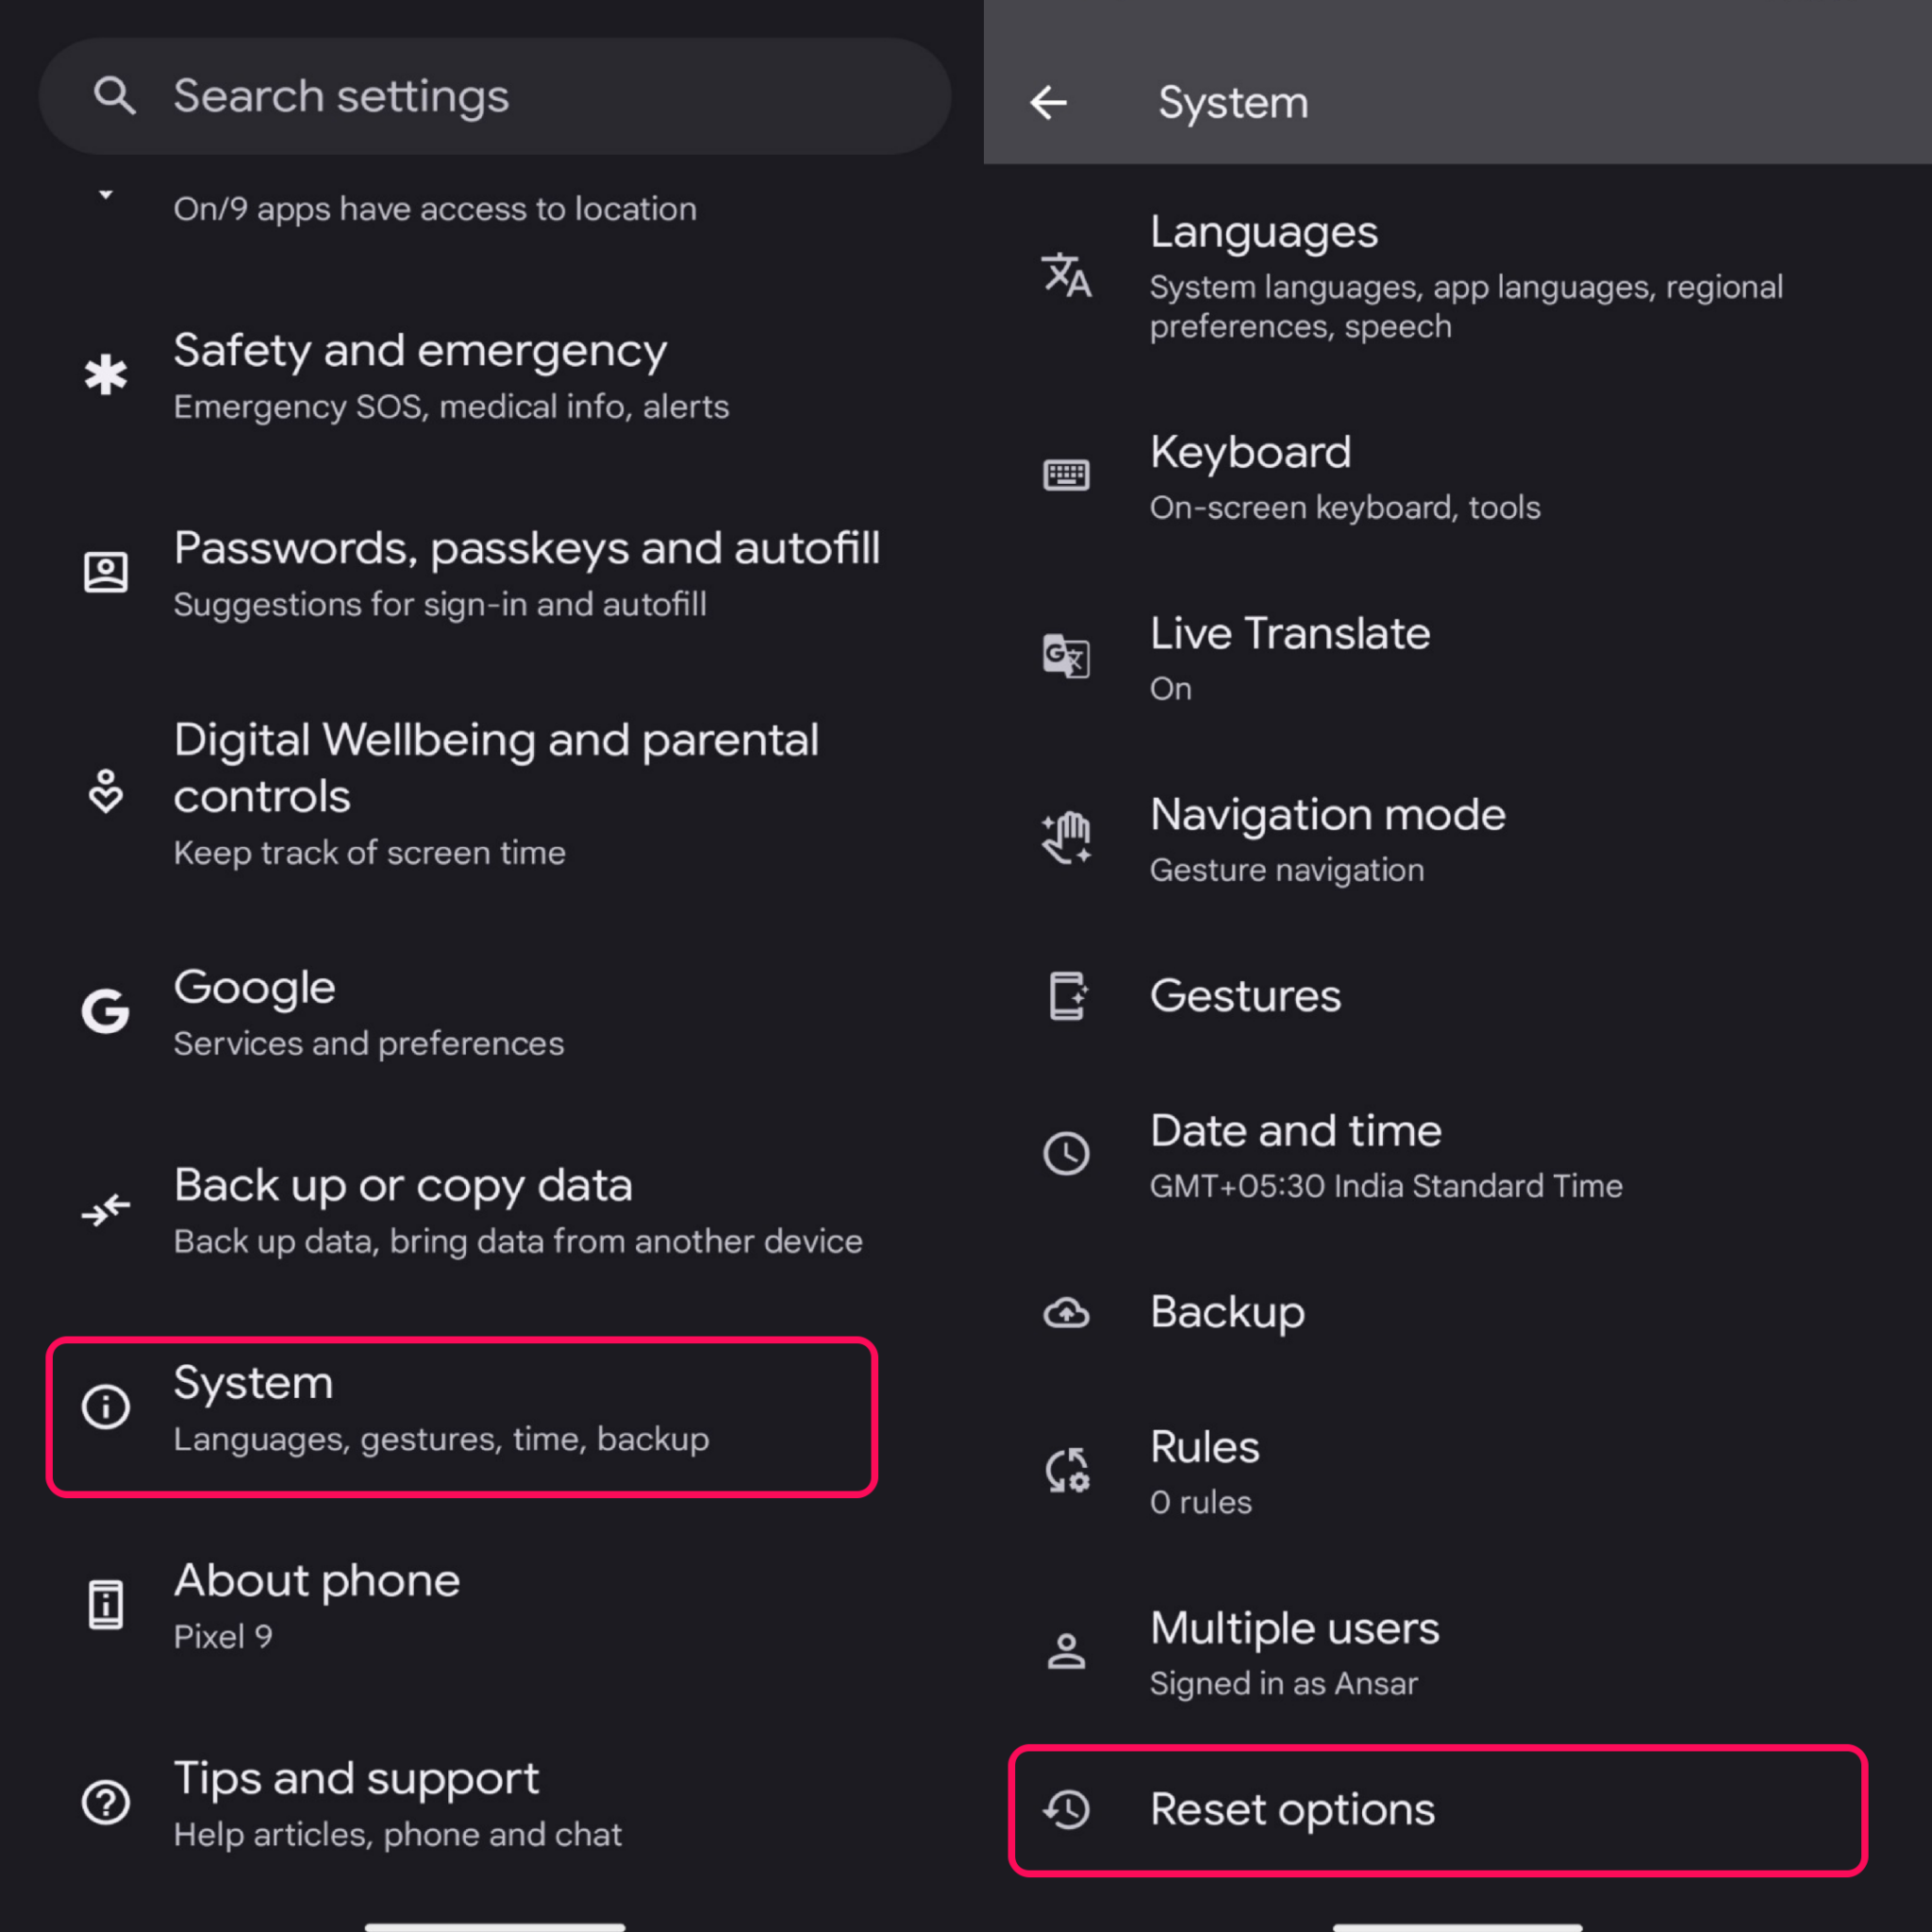
4. Next, select Erase All Data (Factory Reset).
5. Read the on-screen instructions and tap on the Erase All Data.
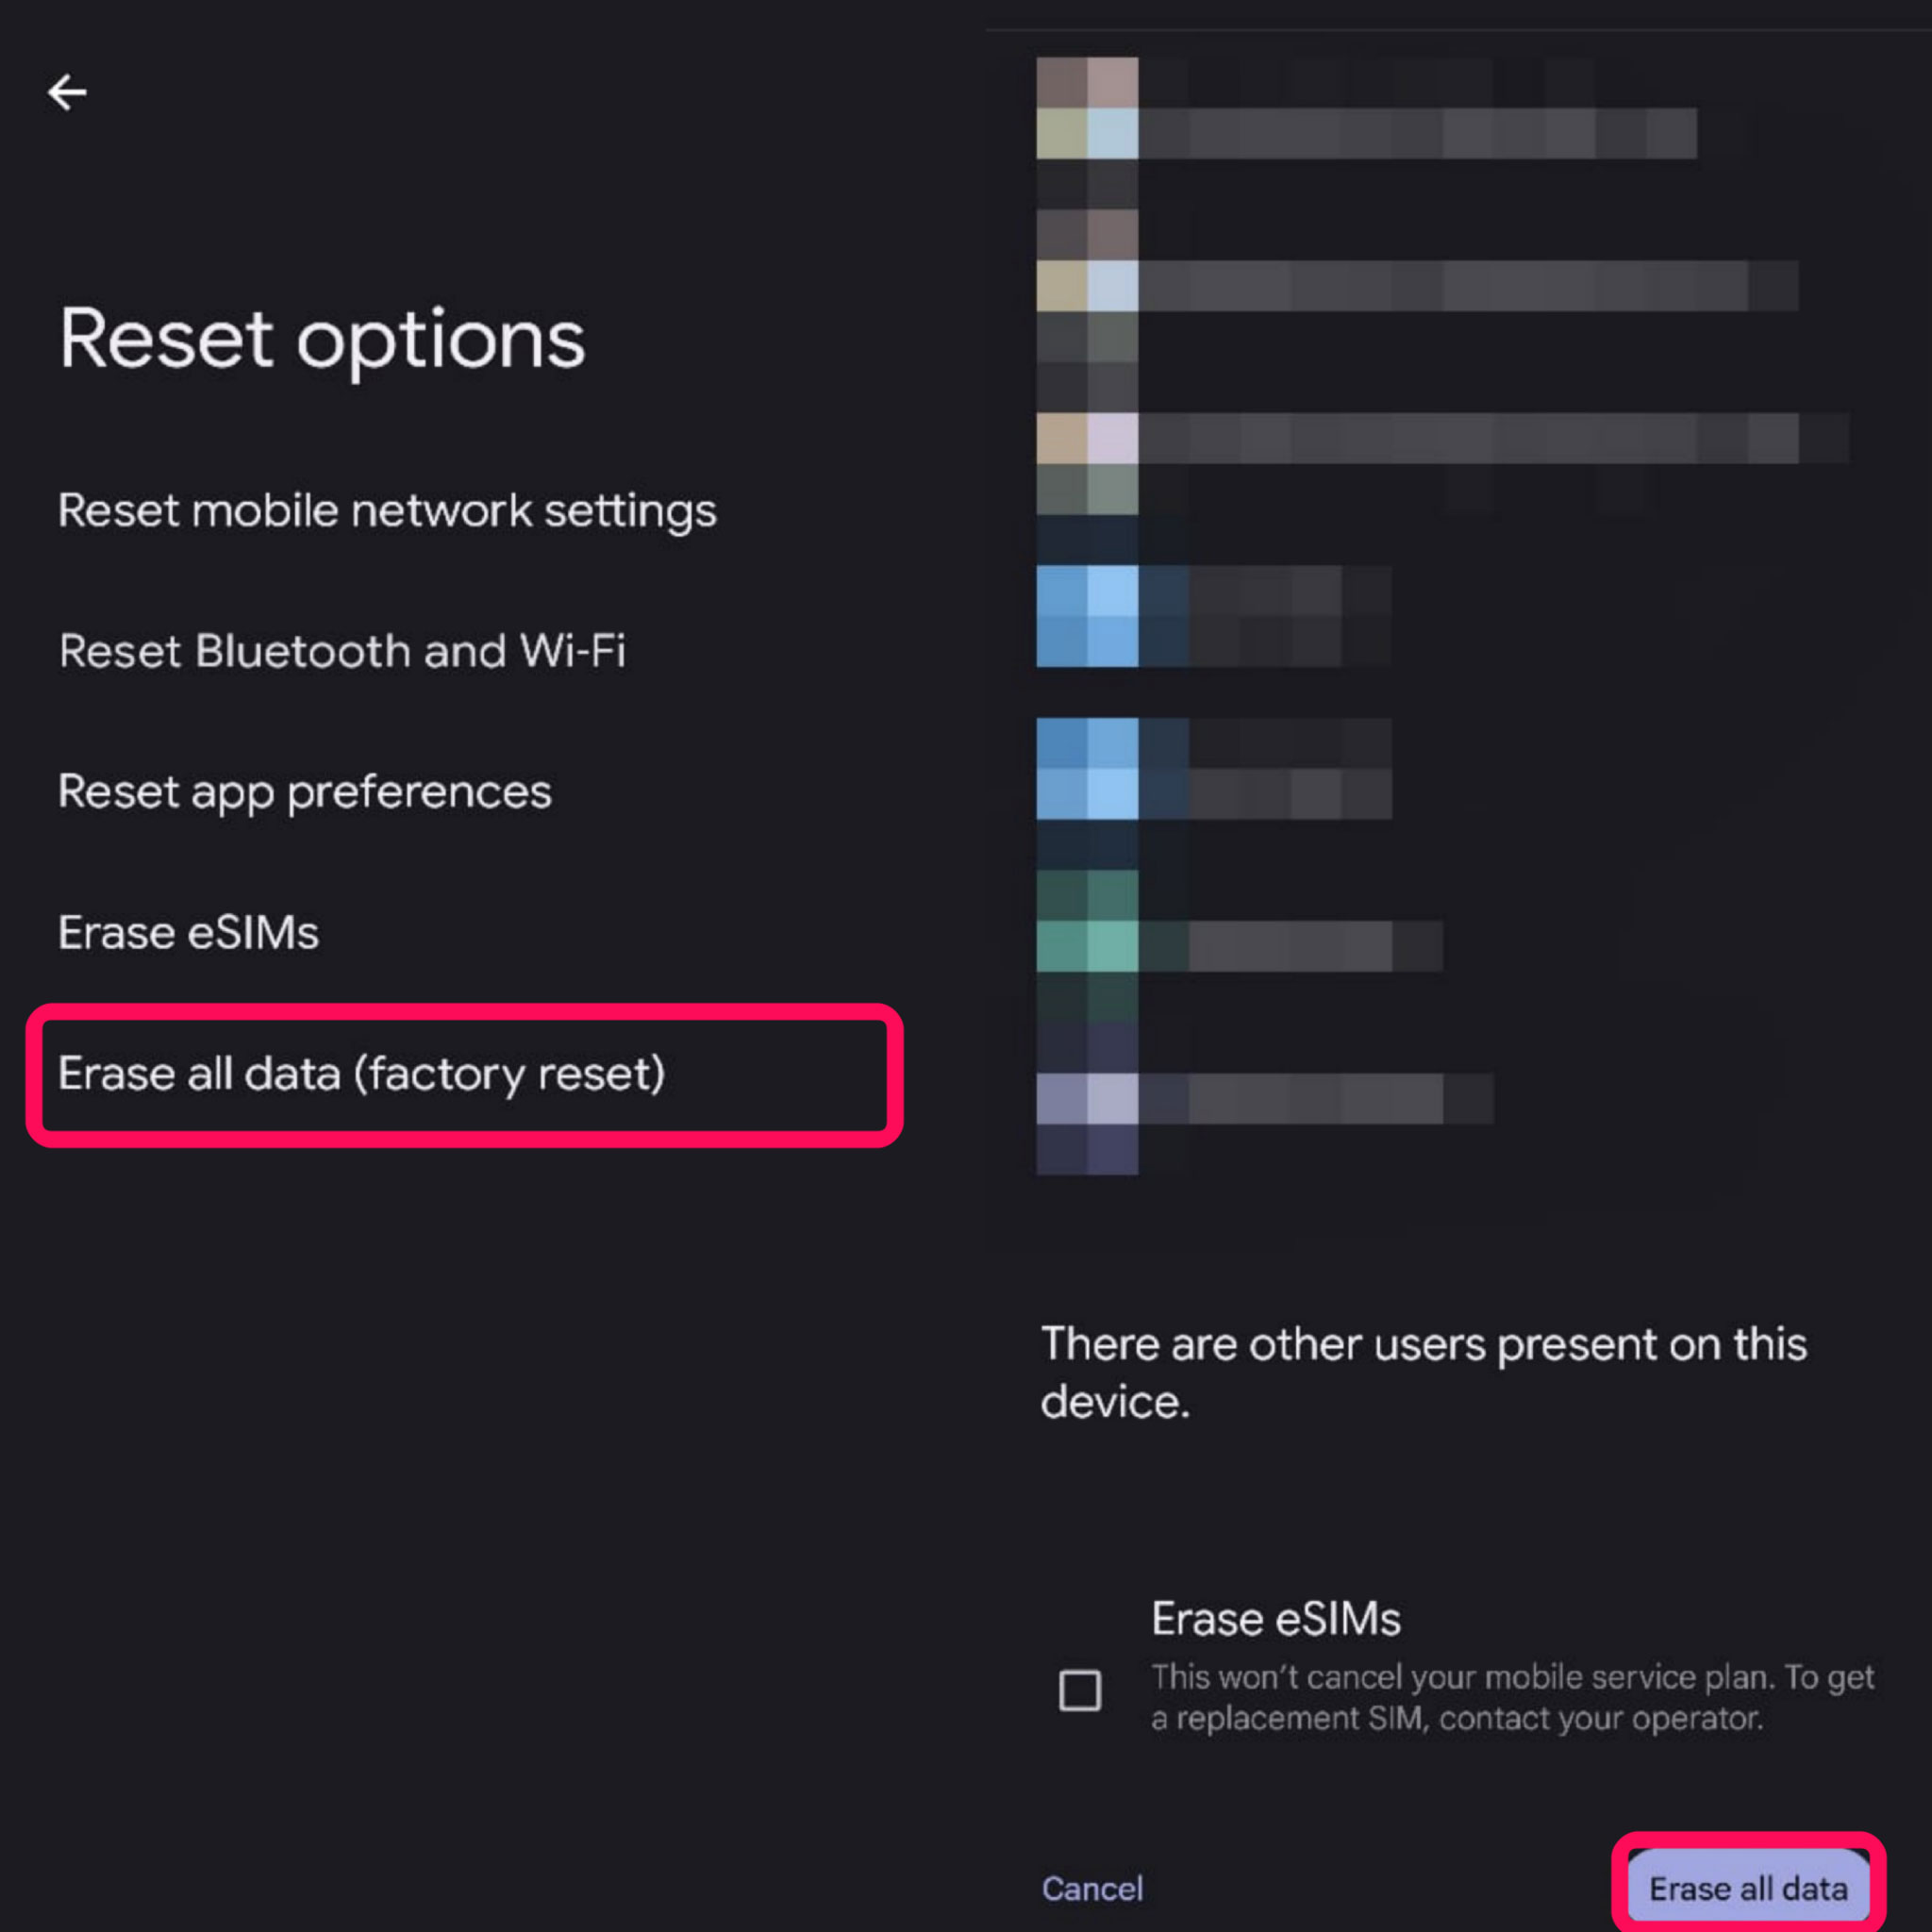
6. Enter your PIN and your device will undergo a factory reset process. It will take a few minutes to complete.
7. Once finished, you will be directed to the setup screen.
8. Follow the on-screen instructions to complete the setup process with the Google account.
9. Congratulations! You have resolved the Wi-Fi network completely.
Fix 18: Contact your Manufacturer
Unfortunately! If the above methods don’t work for you at your end, then you should contact your device manufacturer’s support team for assistance. They will provide you with a solution regarding the issues related to the device or its software system.
Final Words
That’s it. This is how you can quickly solve the Wi-Fi not working on Android 15 devices by following the aforementioned solutions. Make sure to try each and every method we have listed before reaching out to the support team. Nevertheless, the new Android version comes with unknown bugs which can be easily fixed by applying some effective methods.
And if you have bought the device and the issue starts to be visible on the screen, then it can be a hardware issue which you can solve by contacting the manufacturer’s support team. We hope that this guide was helpful to you. Do let us know which of the above solutions was helpful to you. Apart from that, if you have any queries, leave them in the comments section and we will get back to you.
